Sometimes I have to put text on a path

Saturday, July 9, 2011

MathML3 sample


------------------sample 1

image of MathML rendering (Firefox 5 with STIX Fonts):
image of MathML rendering (chrome 14 with STIX fonts and MathJax; this blog):
See the quality of the rendering with your browser (and MathJax used by this "ex-ample blog rendering"):
(please install the "perfect" STIX fonts http://sourceforge.net/projects/stixfonts/)
c = a real + b imaginary complex number

------------------sample 2

image of MathML rendering (Firefox 5 with STIX Fonts):
image of MathML rendering (chrome 14 with STIX fonts and MathJax; this blog):
See the quality of the rendering with your browser (and MathJax used by this "ex-ample blog rendering"):
Logic: ¬pq¬p¬q
Boolean algebra: i=1nAi=i=1nAi
------------------sample 3

image of MathML rendering (Firefox 4 with STIX Fonts):
image of MathML rendering (chrome 14 with STIX fonts and MathJax; this blog):
See the quality of the rendering with your browser (and MathJax used by this "ex-ample blog rendering"):
0 1 x x x = n = 1 1 n + 1 n n
------------------sample 4

image of MathML rendering (Firefox 5 with STIX Fonts):
image of MathML rendering (chrome 14 with STIX fonts and MathJax; this blog):
See the quality of the rendering with your browser (and MathJax used by this "ex-ample blog rendering"):
M = α 1 α 1 q α 1 q n 1 α 2 α 2 q α 2 q n 1 α m α m q α m q n 1

------------------end

Friday, July 8, 2011

a title with TeX symbol: \( \TeX \)

juste a test for a \( \TeX \) title of a post in blogger...

Symbols Tex 1

\( \text{\leq = } \leq \)

\( \text{\geq = } \geq \)

\( \text{\equiv = } \equiv \)

\( \text{\models = } \models \)

\( \text{\prec = } \prec \)

\( \text{\succ = } \succ \)

\( \text{\sim = } \sim \)

\( \text{\perp = } \perp \)

\( \text{\succeq = } \succeq \)

\( \text{\preceq = } \preceq \)

\( \text{\simeq = } \simeq \)

\( \text{\mid = } \mid \)

\( \text{\ll = } \ll \)

\( \text{\gg = } \gg \)

\( \text{\asymp = } \asymp \)

\( \text{\parallel = } \parallel \)

\( \text{\subset = } \subset \)

\( \text{\supset = } \supset \)

\( \text{\approx = } \approx \)

\( \text{\bowtie = } \bowtie \)

\( \text{\subseteq = } \subseteq \)

\( \text{\supseteq = } \supseteq \)

\( \text{\cong = } \cong \)

\( \text{\sqsubset = } \sqsubset \)

\( \text{\sqsupset = } \sqsupset \)

\( \text{\neq = } \neq \)

\( \text{\sqsubseteq = } \sqsubseteq \)

\( \text{\sqsupseteq = } \sqsupseteq \)

\( \text{\doteq = } \doteq \)

\( \text{\frown = } \frown \)

\( \text{\smile = } \smile \)

\( \text{\in = } \in \)

\( \text{\ni = } \ni \)

\( \text{\propto = } \propto \)

\( \text{\vdash = } \vdash \)

\( \text{\dashv = } \dashv \)

\( \text{\leftarrow = } \leftarrow \)

\( \text{\longleftarrow = } \longleftarrow \)

\( \text{\uparrow = } \uparrow \)

\( \text{\Leftarrow = } \Leftarrow \)

\( \text{\Longleftarrow = } \Longleftarrow \)

\( \text{\Uparrow = } \Uparrow \)

\( \text{\rightarrow = } \rightarrow \)

\( \text{\longrightarrow = } \longrightarrow \)

\( \text{\downarrow = } \downarrow \)

\( \text{\Rightarrow = } \Rightarrow \)

\( \text{\Longrightarrow = } \Longrightarrow \)

\( \text{\Downarrow = } \Downarrow \)

\( \text{\leftrightarrow = } \leftrightarrow \)

\( \text{\longleftrightarrow = } \longleftrightarrow \)

\( \text{\updownarrow = } \updownarrow \)

\( \text{\Leftrightarrow = } \Leftrightarrow \)

\( \text{\Longleftrightarrow = } \Longleftrightarrow \)

\( \text{\Updownarrow = } \Updownarrow \)

\( \text{\mapsto = } \mapsto \)

\( \text{\longmapsto = } \longmapsto \)

\( \text{\nearrow = } \nearrow \)

\( \text{\hookleftarrow = } \hookleftarrow \)

\( \text{\hookrightarrow = } \hookrightarrow \)

\( \text{\searrow = } \searrow \)

\( \text{\leftharpoonup = } \leftharpoonup \)

\( \text{\rightharpoonup = } \rightharpoonup \)

\( \text{\swarrow = } \swarrow \)

\( \text{\leftharpoondown = } \leftharpoondown \)

\( \text{\rightharpoondown = } \rightharpoondown \)

\( \text{\nwarrow = } \nwarrow \)

\( \text{\sum = } \sum \)

\( \text{\prod = } \prod \)

\( \text{\coprod = } \coprod \)

\( \text{\int = } \int \)

\( \text{\oint = } \oint \)

\( \text{\bigcap = } \bigcap \)

\( \text{\bigcup = } \bigcup \)

\( \text{\bigsqcup = } \bigsqcup \)

\( \text{\bigvee = } \bigvee \)

\( \text{\bigwedge = } \bigwedge \)

\( \text{\bigodot = } \bigodot \)

\( \text{\bigotimes = } \bigotimes \)

\( \text{\bigoplus = } \bigoplus \)

\( \text{\biguplus = } \biguplus \)

\( \text{\uparrow = } \uparrow \)

Symbols Tex 2

\( \text{\Uparraow = } \Uparrow \)

\( \text{\downarrow = } \downarrow \)

\( \text{\Downarrow = } \Downarrow \)

\( \text{\updownarrow = } \updownarrow \)

\( \text{\Updownarrow = } \Updownarrow \)

\( \text{\lfloor = } \lfloor \)

\( \text{\rfloor = } \rfloor \)

\( \text{\rceil = } \rceil \)

\( \text{\lceil = } \lceil \)

\( \text{\langle = } \langle \)

\( \text{\rangle = } \rangle \)

\( \text{\backslash = } \backslash \)

\( \text{\boxdot = } \boxdot \)

\( \text{\boxplus = } \boxplus \)

\( \text{\boxtimes = } \boxtimes \)

\( \text{\square = } \square \)

\( \text{\blacksquare = } \blacksquare \)

\( \text{\centerdot = } \centerdot \)

\( \text{\lozenge = } \lozenge \)

\( \text{\blacklozenge = } \blacklozenge \)

\( \text{\circlearrowright = } \circlearrowright \)

\( \text{\circlearrowleft = } \circlearrowleft \)

\( \text{\leftrightharpoons = } \leftrightharpoons \)

\( \text{\boxminus = } \boxminus \)

\( \text{\Vdash = } \Vdash \)

\( \text{\Vvdash = } \Vvdash \)

\( \text{\vdash = } \vdash \)

\( \text{\twoheadrightarrow = } \twoheadrightarrow \)

\( \text{\twoheadleftarrow = } \twoheadleftarrow \)

\( \text{\leftleftarrows = } \leftleftarrows \)

\( \text{\rightrightarrows = } \rightrightarrows \)

\( \text{\upuparrows = } \upuparrows \)

\( \text{\downdownarrows = } \downdownarrows \)

\( \text{\upharpoonright = } \upharpoonright \)

\( \text{\downharpoonright = } \downharpoonright \)

\( \text{\rightarrowtail = } \rightarrowtail \)

\( \text{\leftarrowtail = } \leftarrowtail \)

\( \text{\leftrightarrows = } \leftrightarrows \)

\( \text{\rightleftarrows = } \rightleftarrows \)

\( \text{\Lsh = } \Lsh \)

\( \text{\Rsh = } \Rsh \)

\( \text{\rightsquigarrow = } \rightsquigarrow \)

\( \text{\leftrightsquigarrow = } \leftrightsquigarrow \)

\( \text{\looparrowleft = } \looparrowleft \)

\( \text{\looparrowright = } \looparrowright \)

\( \text{\circeq = } \circeq \)

\( \text{\succsim = } \succsim \)

\( \text{\gtrsim = } \gtrsim \)

\( \text{\gtrapprox= } \gtrapprox \)

\( \text{\multimap = } \multimap \)

\( \text{\therefore = } \therefore \)

\( \text{\because = } \because \)

\( \text{\doteqdot = } \doteqdot \)

\( \text{\triangleq = } \triangleq \)

\( \text{\precsim = } \precsim \)

\( \text{\lesssim = } \lesssim \)

\( \text{\lessapprox = } \lessapprox \)

\( \text{\eqslantless = } \eqslantless \)

\( \text{\eqslantgtr = } \eqslantgtr \)

\( \text{\curlyeqprec = } \curlyeqprec \)

\( \text{\curlyeqsucc = } \curlyeqsucc \)

\( \text{\preccurlyeq = } \preccurlyeq \)

\( \text{\leqq = } \leqq \)

\( \text{\leqslant = } \leqslant \)

\( \text{\lessgtr = } \lessgtr \)

\( \text{\backprime = } \backprime \)

\( \text{\risingdotseq = } \risingdotseq \)

\( \text{\fallingdotseq = } \fallingdotseq \)

\( \text{\succcurlyeq = } \succcurlyeq \)

\( \text{\geqq = } \geqq \)

\( \text{\geqslant = } \geqslant \)

\( \text{\gtrless = } \gtrless \)

\( \text{\vartriangleright = } \vartriangleright \)

\( \text{\vartriangleleft = } \vartriangleleft \)

\( \text{\trianlgerighteq = } \trianglerighteq \)

\( \text{\trianglelefteq = } \trianglelefteq \)

\( \text{\bigstar = } \bigstar \)

\( \text{\between = } \between \)

\( \text{\blacktriangledown = } \blacktriangledown \)

\( \text{\blacktriangleright = } \blacktriangleright \)

\( \text{\blacktriangleleft = } \blacktriangleleft \)

\( \text{\vartriangle = } \vartriangle \)

\( \text{\blacktriangle = } \blacktriangle \)

\( \text{\triangledown = } \triangledown \)

Math Blackboard capital letters

\( \text{\mathbb A = } \mathbb A \)

\( \text{\mathbb B = } \mathbb B \)

\( \text{\mathbb C = } \mathbb C \)

\( \text{\mathbb D = } \mathbb D \)

\( \text{\mathbb E = } \mathbb E \)

\( \text{\mathbb F = } \mathbb F \)

\( \text{\mathbb G = } \mathbb G \)

\( \text{\mathbb H = } \mathbb H \)

\( \text{\mathbb I = } \mathbb I \)

\( \text{\mathbb J = } \mathbb J \)

\( \text{\mathbb K = } \mathbb K \)

\( \text{\mathbb L = } \mathbb L \)

\( \text{\mathbb M = } \mathbb M \)

\( \text{\mathbb N = } \mathbb N \)

\( \text{\mathbb O = } \mathbb O \)

\( \text{\mathbb P = } \mathbb P \)

\( \text{\mathbb Q = } \mathbb Q \)

\( \text{\mathbb R = } \mathbb R \)

\( \text{\mathbb S = } \mathbb S \)

\( \text{\mathbb T = } \mathbb T \)

\( \text{\mathbb U = } \mathbb U \)

\( \text{\mathbb V = } \mathbb V \)

\( \text{\mathbb W = } \mathbb W \)

\( \text{\mathbb X = } \mathbb X \)

\( \text{\mathbb Y = } \mathbb Y \)

\( \text{\mathbb Z = } \mathbb Z \)

Some TeX symbols

\( \text{\eqcirc = } \eqcirc \)

\( \text{\lesseqgtr = } \lesseqgtr \)

\( \text{\gtreqless = } \gtreqless \)

\( \text{\lesseqqgtr = } \lesseqqgtr \)

\( \text{\gtreqqless = } \gtreqqless \)

\( \text{\Rrightarrow = } \Rrightarrow \)

\( \text{\Lleftarrow = } \Lleftarrow \)

\( \text{\veebar = } \veebar \)

\( \text{\barwedge = } \barwedge \)

\( \text{\doublebarwedge = } \doublebarwedge \)

\( \text{\measuredangle = } \measuredangle \)

\( \text{\sphericalangle = } \sphericalangle \)

\( \text{\varpropto = } \varpropto \)

\( \text{\smallsmile = } \smallsmile \)

\( \text{\smallfrown = } \smallfrown \)

\( \text{\Subset = } \Subset \)

\( \text{\Supset = } \Supset \)

\( \text{\Cup = } \Cup \)

\( \text{\Cap = } \Cap \)

\( \text{\curlywedge = } \curlywedge \)

\( \text{\curlyvee = } \curlyvee \)

\( \text{\leftthreetimes = } \leftthreetimes \)

\( \text{\rightthreetimes = } \rightthreetimes \)

\( \text{\subseteqq = } \subseteqq \)

\( \text{\supseteqq = } \supseteqq \)

\( \text{\bumpeq = } \bumpeq \)

\( \text{\Bumpeq = } \Bumpeq \)

\( \text{\lll = } \lll \)

\( \text{\ggg = } \ggg \)

\( \text{\circledS = } \circledS \)

\( \text{\pitchfork = } \pitchfork \)

\( \text{\dotplus = } \dotplus \)

\( \text{\backsim = } \backsim \)

\( \text{\backsimeq = } \backsimeq \)

\( \text{\complement = } \complement \)

\( \text{\intercal = } \intercal \)

\( \text{\circledcirc = } \circledcirc \)

\( \text{\circledast = } \circledast \)

\( \text{\circleddash = } \circleddash \)

\( \text{\lvertneqq = } \lvertneqq \)

\( \text{\gvertneqq = } \gvertneqq \)

\( \text{\nleq = } \nleq \)

\( \text{\ngeq = } \ngeq \)

\( \text{\nless = } \nless \)

\( \text{\ngtr = } \ngtr \)

\( \text{\nprec = } \nprec \)

\( \text{\nsucc = } \nsucc \)

\( \text{\lneqq = } \lneqq \)

\( \text{\gneqq = } \gneqq \)

\( \text{\nleqslant = } \nleqslant \)

\( \text{\ngeqslant = } \ngeqslant \)

\( \text{\lneq = } \lneq \)

\( \text{\gneq = } \gneq \)

\( \text{\npreceq = } \npreceq \)

\( \text{\succneqq = } \succneqq \)

\( \text{\precneqq = } \precneqq \)

\( \text{\precnapprox = } \precnapprox \)

\( \text{\succnapprox = } \succapprox \)

\( \text{\lnapprox = } \lnapprox \)

\( \text{\gnapprox = } \gnapprox \)

\( \text{\nsim = } \nsim \)

\( \text{\ncong = } \ncong \)

\( \text{\diagup = } \diagup \)

\( \text{\diagdown = } \diagdown \)

\( \text{\varsubsetneqq = } \varsubsetneqq \)

\( \text{\varsupsetneqq = } \varsupsetneqq \)

\( \text{\subsetneqq = } \subsetneqq \)

\( \text{\supsetneqq = } \supsetneqq \)

\( \text{\nparallel = } \nparallel \)

\( \text{\nmid = } \nmid \)

\( \text{\nshortmid = } \nshortmid \)

\( \text{\nshortparallel = } \nshortparallel \)

\( \text{\nvdash = } \nvdash \)

\( \text{\nVdash = } \nVdash \)

\( \text{\ntrianglerighteq = } \ntrianglerighteq \)

\( \text{\ntrianglelefteq = } \ntrianglelefteq \)

\( \text{\ntriangleleft = } \ntriangleleft \)

\( \text{\ntriangleright = } \ntriangleright \)

\( \text{\nleftarrow = } \nleftarrow \)

\( \text{\nrightarrow = } \nrightarrow \)

\( \text{\nLeftarrow = } \nLeftarrow \)

\( \text{\nRightarrow = } \nRightarrow \)

\( \text{\nLeftrightarrow = } \nLeftrightarrow \)

\( \text{\nleftrightarrow = } \nleftrightarrow \)

\( \text{\divideontimes = } \divideontimes \)

\( \text{\varnothing = } \varnothing \)

\( \text{\nexists = } \nexists \)

\( \text{\Finv = } \Finv \)

\( \text{\Game = } \Game \)

\( \text{\eth = } \eth \)

\( \text{\eqsim = } \eqsim \)

\( \text{\beth = } \beth \)

\( \text{\gimel = } \gimel \)

\( \text{\daleth = } \daleth \)

\( \text{\lessdot = } \lessdot \)

\( \text{\gtrdot = } \gtrdot \)

\( \text{\ltimes = } \ltimes \)

\( \text{\rtimes = } \rtimes \)

\( \text{\shortmid = } \shortmid \)

\( \text{\shortparallel = } \shortparallel \)

\( \text{\smallsetminus = } \smallsetminus \)

\( \text{\thicksim = } \thicksim \)

\( \text{\thickapprox = } \thickapprox \)

\( \text{\approxeq = } \approxeq \)

\( \text{\succapprox = } \succapprox \)

\( \text{\precapprox = } \precapprox \)

\( \text{\curvearrowleft = } \curvearrowleft \)

\( \text{\curvearrowright = } \curvearrowright \)

\( \text{\digamma = } \digamma \)

\( \text{\varkappa = } \varkappa \)

\( \text{\Bbbk = } \Bbbk \)

\( \text{\hslash = } \hslash \)

\( \text{\backepsilon = } \backepsilon \)

All about "How to post mathematics?" mathML, LaTeX, MathJax with Chrome/Firefox and Best online/offline rich text editors (webmail, word processor); Comparison of off-line on-line HTML/text editors and browsers.

outline:
1-----free and multi-platform HTML editors
2-----Rich text/html editors inside blogger, Gmail, Knol, wordpress.com, webmail...
3-----Web-based word processor
4---- Two commercial applications & free equation editors
5-----Browsers and MATHML viewers
6-----Free javascript library for math on web pages: JavaScript display engine for mathematics that works in all browsers.
 

7-----Some interesting links 


8-----Inserting Characters (unicode, Math Font Styles)


How to post mathematics or web applications with mathematica and matlab, see :
http://ex-ample.blogspot.com/2011/06/web20-services-mathematica-and-matlab.html

How to post mathematics in wikipedia or in MediaWiki? , see:
http://ex-ample.blogspot.com/2011/07/mediawiki-api.html
An "ex-ample" : the online  NIST Digital Library of Mathematical Functions {Abramowitz and Stegun’s (1964) Handbook of Mathematical Functions with Formulas, Graphs, and Mathematical Tables}.
http://ex-ample.blogspot.com/2011/07/best-ex-ample-nist-digital-library-of.html

read this article (@1999, updated 2002) :
Approaches to WWW Mathematics Documents
http://hutchinson.belmont.ma.us/tth/webmath.html
------------------
preface:
ex-ample1 (mathML3): http://ex-ample.blogspot.com/2011/07/mathml3-sample.html
(this example comes from https://eyeasme.com/Joe/MathML/HTML5_MathML_browser_test.html
but this URL does not work with Chrome 14+STIX font+MathJax but works with firefox; MathML code without return must be included in HTML code of a post).

ex-ample2 (mathML2): http://www.w3.org/Math/testsuite/mml2-testsuite/TortureTests/Complexity/complex1.xml

ex-ample3: this blog (left sidebar and matML latex labels):
http://ex-ample.blogspot.com/2011/07/symbols-tex-1.html

Math ML(Mathematical Markup Language)  is an XML language designed to present complex equations:
http://en.wikipedia.org/wiki/MathML
http://www.w3.org/Math/
http://www.personal.psu.edu/ejp10/blogs/tlt/tutorials/mathml.html

Wikipedia uses LaTeX (and limited MathML).
 MS Office 2007 and OpenOffice.org (via OpenOffice.org Math: http://en.wikipedia.org/wiki/OpenOffice.org_Math), as well as mathematical software products such as Mathematica supports MathML.
Knol use LaTeX:
http://knol.google.com/k/stef42-ex-ample-blogger-com/mathematics-and-web-html5-latex-mathml/2fdyfc9mft4ir/1?hd=ns# 

MathML 3.0 was officially released as a W3C Recommendation (@Oct 2010). It is backward compatible with MathML 2.
MathML deals not only with the presentation but also the meaning of formula components (the latter part of MathML is known as “Content MathML”). Because the meaning of the equation is preserved separate from the presentation, how the content is communicated can be left up to the user.
If you work in science you probably know LaTeX. LaTeX is gorgeous; enabling scientific authoring in an unrivaled way. Nevertheless, LaTeX is somewhat outdated. It doesn't support the clear separation between content and style that modern standards imply. Editing complex equations can become a tedious job. An alternative might be the combination of DocBook with MathML.
DocBook is an XML language (http://en.wikipedia.org/wiki/DocBook). It's a semantic markup language for technical documentation (http://www.docbook.org/tdg/). It was originally intended for writing technical documents related to computer hardware and software but it can be used for any other sort of documentation.
As a semantic language, a DocBook document does not describe what their contents "look like," but rather the meaning of those contents. For example, rather than explaining how the abstract for an article might be visually formatted, DocBook simply says that a particular section is an abstract. It is up to an external processing tool or application to decide where on a page the abstract should go and what it should look like. And, indeed, to decide whether or not it should be included in the final output at all. It provides a vast number of semantic element tags. They are divided into three broad categories: structural, block-level, and inline. Because DocBook is an XML format, conforming to a well-defined schema, documents can be validated and processed using any tool or programming language which includes XML support.
The current version is DocBook, 5.0.DocBook 4.x documents are not compatible with DocBook 5, but they can be converted into DocBook 5 documents through the use of an XSLT stylesheet.
Source: http://sourceforge.net/projects/docbook/
A group of XSLT stylesheets for transforming DocBook into various viewable formats: http://en.wikipedia.org/wiki/DocBook_XSL

This post is focused on "how to publish mathematics" not on "document languages", beyond of the scope. And then we focused on these languages : 
  • "your screen image": browser rendering engine and javascript rendering engine (in this blog the javascript library MathJax), 
  • HTML, HTML5, CSS... (quality of the code source of the page)
  • MathML (quality of the code source of the page), 
  • laTeX (quality of the code source of the page).
------------------------------------------------------------------------------------
MathML is too verbose to edit using a text editor then we need a MathML editor.

Comparison of HTML editor (stand alone); 
http://en.wikipedia.org/wiki/List_of_HTML_editors
List of math editors:
http://www.w3.org/Math/Software/mathml_software_cat_editors.html

Comparison of open source and commercial WYSIWYG web-based editors (by replacing a textarea or by adding their own editable block): 
http://geniisoft.com/showcase.nsf/WebEditors). 


Some packages and Mathematics environments (also some corrections of bad rendering):
If your document requires only a few simple mathematical formulas,  LaTeX has most of the tools that you will need. If you are writing a scientific document that contains numerous complicated formulas, the amsmath package introduces several new commands that are more powerful and flexible than the ones provided by LaTeX. The mathtools package fixes some amsmath quirks and adds some useful settings, symbols, and environments to amsmath.


an equation in blogger; mathML (Standard Deviation)


x=b±b24ac2a

an equation (LaTeX) from latex demo page of mathjax

http://www.mathjax.org/demos/tex-samples/

\begin{aligned}
\dot{x} & = \sigma(y-x) \\
\dot{y} & = \rho x - y - xz \\
\dot{z} & = -\beta z + xy
\end{aligned}

Wednesday, July 6, 2011

Useful HTML5/CSS3 Snippets For Web Developers: flips, canvas, menu (current top menu of the Apple.com website)

Useful HTML5/CSS3 Snippets For Web Developers | Splashnology:

(4windows: HTML-CSS-javascript-result)

(all flips)
(Playing with canvas and javascript, this is a ball that follows the mouse with resistance)
(Draws circles on the canvas)
(Using css3 transitions , text shadow with transparent color will create a bluring and unbluring text affect)
http://nettuts.s3.amazonaws.com/855_cssProperties/flipper.html

(flip)
(A simple fluid horizontal navigation using the CSS3 Flexible Box model)

------------menu
http://www.splashnology.com/article/creating-css3-navigation-menus-fresh-tutorials-techniques-and-tools/1385/:
http://deepubalan.com/blog/2011/06/17/free-pure-css-dropdown-menu-using-target-pseudo-class/

http://www.marcofolio.net/css/the_apple.com_navigation_menu_created_using_only_css3.html
(This menu is a clone of the current top menu of the Apple.com website (without the animations/effects etc. of the search navigation). Dive into the source code of this page to find out how it's created.)


Chrome=a source code HTML editor? Some Developer EXTENSIONS

A) Chrome is a web browser, not a source code editor (you cannot edit the source code when viewed in Chrome) but you have a "code editor egg": there is an "Edit HTML" in the browser Inspector. 

1) Right click on the page (or ctrl (mac user)), and choose Inspect Element
2) Click on the Elements tab
3) Right click on the HTML element and choose "Edit as HTML"
4) Do whatever you want and press ENTER, now you have everything saved.

You can manipulate the DOM in any way possible. Such as adding nodes, deleteting nodes. You can alter CSS and see network traffic.

(ref: http://www.google.com/support/forum/p/Chrome/thread?tid=2cc92bb429395ec8&hl=en)


B)some developer extensions for Chrome 


iMacro:
https://chrome.google.com/webstore/detail/cplklnmnlbnpmjogncfgfijoopmnlemp?hl=fr


NoteBook Professional (Images, Text, HTMLs, Note anything you want, A powerful HTML editor, have easy accsess to Google NoteBook or Google Docs):
https://chrome.google.com/webstore/detail/elkgcninebemfhajfhmiffbndloiacbe?hl=fr#


HTML Instant:
https://chrome.google.com/webstore/detail/hfgifphlikdnjfcegkkmhohddfjhnpjd?hl=fr
http://htmlinstant.com/

live editor:
https://chrome.google.com/webstore/detail/lmbnpidmeknioaojjlbneohdflgilhnf

Scraper is a Google Chrome extension for getting data out of web pages and into spreadsheets.
Scraper is a simple data mining extension for Google Chrome™ that is useful for online research when you need to quickly analyze data in spreadsheet form.
https://chrome.google.com/webstore/detail/mbigbapnjcgaffohmbkdlecaccepngjd?hl=fr
https://github.com/mnmldave/scraper/blob/master/LICENSE.txt

service page s(about: or chrome:)
https://chrome.google.com/webstore/detail/fjmhjjohhiehaoljianalpmfcceojaff?hl=fr

Chrome Sniffer
https://chrome.google.com/webstore/detail/homgcnaoacgigpkkljjjekpignblkeae?hl=fr

The Web Developer EXTENSION for firefox and chrome:
 http://chrispederick.com/work/web-developer/
download the extension for chrome:
https://chrome.google.com/webstore/detail/bfbameneiokkgbdmiekhjnmfkcnldhhm#
The Web Developer extension adds various web developer tools to a browser. The extension is available for Firefox and Chrome, and will run on any platform that these browsers support including Windows, Mac OS X and Linux.
The Web Developer extension adds a toolbar button to the browser with various web developer tools. This is the official port of the popular Web Developer extension for Firefox written by the same person.

firebug lite:
https://chrome.google.com/extensions/detail/bmagokdooijbeehmkpknfglimnifench


C)Some Apps in chrome:


Sourcekit (with dropbox):
https://chrome.google.com/webstore/detail/iieeldjdihkpoapgipfkeoddjckopgjg?hl=fr
Embedded is the excellent Ajax.org's Ace text editor component. This allows for a very natural text editing experience while retaining Chrome's amazing JavaScript performance.

BeFunky Photo Editor allows everyday people to easily create photographically rich and artistic results from their digital images without the need for any technical knowledge.
Photo Effects: Get Creative with 190 easy-to-use photo effects in 30 different categories.
Photo Editing Tools: Adjust: contrast, brightness, exposure, hue, saturation and colors. Fix common photo problems like bad lighting, digital noise, fuzzy colors and details with one click.
Add speech bubbles, frames and cool shapes: Give your digital creations extra character and pizzazz with BeFunky Goodies, Frames and Text tools.
Photo Storage and Tracking: Keep track of your previous uploads and store an unlimited number of your edits.
Save and Share: Save your creations to your computer or share them on your favorite social networking and photo sharing sites.

3Dtin:

webkit,rendering engine, HTML5, webkit2 and WebM. Google Chrome. mobile web browsers. WebM HTML5 player.

Webkit, webkit2 and HTML5

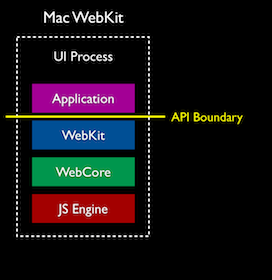
WebKit (based on KHTML) is a layout engine designed to allow web browsers to render web pages. WebKit powers Google Chrome, Safari, the experimental browser included with the Amazon Kindle ebook reader...
WebKit is used as the rendering engine.

The WebKit engine provides a set of classes to display web content in windows (it also implements browser features such as following links when clicked by the user and managing a history of pages recently visited).

2003
Written in C++, it's fewer than 140,000 lines of code and is cleanly designed and standards compliant  (@Jan 2003; see the email of the engineering manager of Safari: http://lists.kde.org/?l=kfm-devel&m=104197092318639&w=2).
mac-webkit-stack
2007
The project announced (@ nov 2007) that it had accomplished support for HTML5 media features, allowing for embedded video to be natively rendered and script-controlled in WebKit (http://www.webkit.org/blog/140/html5-media-support/).

The HTML5 video and audio elements add native support for embedding video and audio content in web pages. They also provide a rich scripting API for controlling playback. Adding video to a web page is almost as simple as adding an image. The current implementation supports all formats that QuickTime supports, including installed 3rd party codecs.

2008
Google released a very large portion of Chrome's source code, including its V8 JavaScript engine, as an open source project entitled Chromium. Chromium implements the same feature set as Chrome, but lacks built-in automatic updates and Google branding. Chromium, unlike the pre-release versions of Chrome, is updated almost every day. It does not include the built-in Flash Player and Google Auto-updater found in Chrome.
http://www.google.com/chrome
http://www.chromium.org/

2010
Differences between chromium webkit and webkit2.
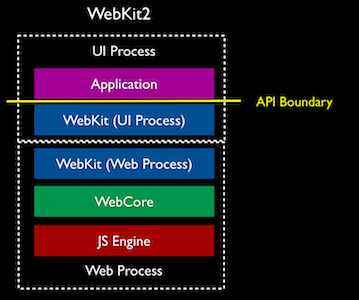
WebKit2 is designed to support a split process model, where the web content (JavaScript, HTML, layout...) runs in a separate process from the application user interface. This model is similar to what Google Chrome offers, with the major difference being that it has built the process split model directly into the framework, allowing other clients to use it. Currently WebKit2 is available for Mac and Windows. Webkit2 is an incompatible API change from the original WebKit (so it will probably be installed as something like /System/Library/WebKit2.framework on Mac).
http://trac.webkit.org/wiki/WebKit2
webkit2-stack


How is This Different from Chromium WebKit?
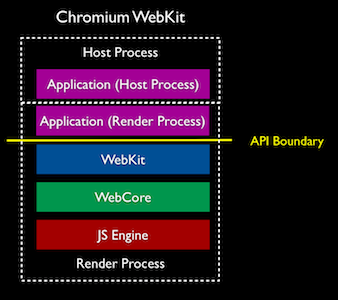
Chromium takes a different approach to multiprocess:

Notice that in this case, the the process boundary is ABOVE the API boundary.
Chromium WebKit does not directly provide a multiprocess framework, rather, it is optimized for use as a component of a multiprocess application, which does all the proxying and process management itself. The Chrome team at Google did a great job at trailblazing multiprocess browsing with Chrome. But it's difficult to reuse their work, because the critical logic for process management, proxying between processes and sandboxing is all part of the Chrome application, rather than part of the API layer. So if another WebKit-based application or another port wanted to do multiprocess based on Chromium WebKit, it would be necessary to reinvent or cut & paste a great deal of code.
http://trac.webkit.org/wiki/Chromium

2011 "HTML5player" tactics
The Chrome Product manager announced (@Jan 2011) that Chrome will no longer support H.264 video codec for its HTML 5 player, citing the desire to bring Google Chrome more inline with the currently available open codecs available in the Chromium project (http://blog.chromium.org/2011/01/html-video-codec-support-in-chrome.html):

"We expect even more rapid innovation in the web media platform in the coming year and are focusing our investments in those technologies that are developed and licensed based on open web principles. To that end, we are changing Chrome’s HTML5 video support to make it consistent with the codecs already supported by the open Chromium project. Specifically, we are supporting the WebM (VP8) and Theora video codecs, and will consider adding support for other high-quality open codecs in the future. Though H.264 plays an important role in video, as our goal is to enable open innovation, support for the codec will be removed and our resources directed towards completely open codec technologies."

The WebM Project was launched (@2010) to bring an open, world-class video codec to the web: http://www.webmproject.org/
Select the categories WebP and WebM in this blog...


-----------------Now (@June 2011):
Chrome was the third most widely used browser.
See the slope of its increase (more than X2/year): http://gs.statcounter.com/
around 21% worldwide usage share of web browsers (20% Europe and 19% France), according to StatCounter (@ june 2011):


See the timeline representing the history of various web browsers:
http://en.wikipedia.org/wiki/List_of_web_browsers#WebKit-based

See the comparison of web browser engines:
http://en.wikipedia.org/wiki/Comparison_of_layout_engines

http://www.webkit.org/

Mobile:
Mobile web browsers have been built around WebKit such as the S60 browser on Symbian mobile phones, Blackberry Browser (ver 6.0+), and the Android Web browser.
WebKit will continue to dominate the mobile industry as the market penetration of smartphones:

"Task manager" of Google Chrome; le gestionnaire de tâches;monitor the amount of memory taken up; accès à l'espace mémoire occupé

Click the wrench icon on the browser toolbar.
Select Tools.
Select Task manager.

Use the Task Manager to get details about a specific process running in Google Chrome, or to force a misbehaving tab or application to close.

For each active item in Google Chrome, you can monitor the amount of memory taken up, the amount of CPU used, and the network activity (bytes sent and received).

Ref:
http://www.google.com/support/chrome/bin/answer.py?answer=95672

--------an example:
-the post editor of blogger takes 70MB.
-a rich complex HTML5 page ("HTML5 showcase"; local with google app engine) takes around 70MB.
"HTML5 showcase":
http://ex-ample.blogspot.com/2011/06/with-google-app-engine-there-are-no.html
http://www.htmlfivewow.com/slide1

The Gears team implemented a multi-process architecture in Chrome where, by default, a separate process is allocated to each site instance and plugin, a procedure referred to as process isolation. This prevents tasks from interfering with each other, increasing security and stability. An attacker successfully gaining access to one application cannot gain access to others, and failure in one instance results in a Sad Tab screen, similar to the well-known Sad Mac, but only a single tab crashes instead of the whole application. This strategy exacts a fixed per-process cost up front, but results in less memory bloat overall as fragmentation is confined to each instance and no longer requires further memory allocations.

Chrome includes a process management utility called Task Manager which allows the user to see what sites and plugins are using the most memory, downloading the most bytes and over-utilizing the CPU and provides the ability to terminate them.

Firefox and Safari are also adopting this architecture, meaning that most common browsers use a multi-process architecture.

---------en français:

Le gestionnaire de tâches permet l'accès à des détails à propos d'un processus en cours dans Google Chrome (ou pour forcer la fermeture d'un onglet ou d'une application défaillants).

Pour ouvrir le gestionnaire de tâches
1/Cliquez sur l'icône représentant une clé à molette  qui est située dans la barre d'outils du navigateur à droite.
Sélectionnez Outils.
Sélectionnez Gestionnaire de tâches.

Pour chaque élément actif dans Google Chrome, vous pouvez "surveiller" l'espace mémoire occupé, l'utilisation du processeur et l'activité réseau (octets envoyés et reçus).

Le gestionnaire permet d'arrêter un processus:
pour forcer la fermeture d'une page Web ou d'une application dans Google Chrome, sélectionnez la page Web dans le gestionnaire, puis cliquez sur le bouton Arrêter le processus.

Tuesday, July 5, 2011

google app engine: clone HTML5wow ;"app.yaml";HTML5 slide/app;appspot;mercurial

See the app "HTML5wow":
http://ex-ample.blogspot.com/2011/06/with-google-app-engine-there-are-no.html

See the modified clone:
http://ex-ample.appspot.com


----step 1: clone a source
Two choices:
1-a) clone in a  repository hosted at Google Code.
1-b) clone with a local copy with Mercurial

1-a) if you want to "clone" a source directly in code.google.com
and you create a clone of the html5wow repository hosted at Google Code.

and select your clone and this window appears:
Click on "app.yaml":
application: html5wow
version: 1
runtime: python
api_version: 1


this runtime is python (it is important to verify (many differences between java, python and go)).
--------------


1-b) clone with a local copy; use Mercurial:
If you want to get a local copy of the html5wow repository, use with this command (mercurial):
hg clone https://html5wow.googlecode.com/hg/ html5wow

This post explain the first steps to do this local clone (mac OSX):

Mercurial is a free distributed source control management tool:
http://en.wikipedia.org/wiki/Mercurial
This project's Mercurial repository may be accessed using many different client programs and plug-ins:
http://mercurial.selenic.com/downloads/
Mercurial is written in Python with platform independence in mind. You can either download a binary package for the system of your choice or build it from sources. Mercurial uses Python (versions 2.4 through 2.7). Most ready-to-run Mercurial distributions include Python or use the Python that comes with your operating system.
Mercurial 1.9 for MacOS X 10.5 = one .zip file of 2.7MB (only one mkpg of 3MB--at the end 10MB on your local hard disk)
http://mercurial.berkwood.com/binaries/Mercurial-1.9-py2.5-macosx10.5.zip


This package installs :

  • the hg executable in /usr/local/bin and 
  • the Mercurial files in /Library/Python/2.5/site-packages/mercurial.


site-package

Mercurial: Traditional version control systems such as Subversion are typical client-server architectures with a central server to store the revisions of a project. In contrast, Mercurial is truly distributed, giving each developer a local copy of the entire development history. This way it works independent of network access or a central server. Committing, branching and merging are fast and cheap.

Verify that you have Python 2.5.x...
Now use the stand alone application "terminal" (included in mac OSX):
after the prompt, write "Python"
You receive this message:

Python 2.5.1 (r251:54863, Dec 16 2010, 14:12:43) 
[GCC 4.0.1 (Apple Inc. build 5465)] on darwin
Type "help", "copyright", "credits" or "license" for more information.
Now quit the interpreter Python line command (control D) 
and after enter this command after the prompt $:

hg clone https://html5wow.googlecode.com/hg/ html5wow


And you get this message (the download is fast : less than 3 minutes):

warning: certificate for html5wow.googlecode.com can't be verified (Python too old)
requesting all changes
adding changesets
adding manifests
adding file changes

added 388 changesets with 1822 changes to 1263 files (+1 heads)
updating to branch default
1129 files updated, 0 files merged, 0 files removed, 0 files unresolved
macbook-proS:~ stef$

Now you have a local copy on your hard disk of the html5wow source code.

This code is saved here:

-------
And it is up to you!
See the hello-guestbook app engine first steps:
http://ex-ample.blogspot.com/2011/07/first-steps-google-appengine-mac.html
http://ex-ample.blogspot.com/2011/07/hello-with-google-app-engine-and-webapp.html

mandelbrot-tiles.appspot: google app engine and Go (programming language); demos/examples;Go on App Engine makes it possible to deploy efficient, CPU-intensive web applications

Start with this "ex-ample": 
http://mandelbrot-tiles.appspot.com/


Very good "ex-ample" of the use of maps.google for image viewer (and with image generator).


See also this" Go ex-ample":
http://ex-ample.blogspot.com/2011/07/moustachioappspot-google-app-engine-and.html

------source
http://code.google.com/p/appengine-go/source/browse/example/

Get a local copy of the appengine-go repository with this command (clone with mercurial):
http://code.google.com/p/appengine-go/source/checkout


When you download the SDK (go_appengine_sdk_darwin_386-1.5.0.zip) and install on your local hard disk,
in the menu demos, the source is in  go-mandelbrot.


-157 lines of Go:
http://code.google.com/p/appengine-go/source/browse/example/mandelbrot/mandelbrot/mandelbrot.go
-90lines of HTML:
http://code.google.com/p/appengine-go/source/browse/example/mandelbrot/map.html

-------Google Maps/Google Earth APIs

moustachio.appspot: google app engine and Go (programming language); demos/examples;Go on App Engine makes it possible to deploy efficient, CPU-intensive web applications

Start with this "ex-ample": 
http://moustach-io.appspot.com/
Tutorial of Moustachio (a Go-GEA (Go google engine app)):
1)enter a log account (just an email)

2)select and upload your image (here a .png of 600KB (1:3), 650X755 pixels (0.5MPix))
(i also try a .webP (same image with high quality : a ratio of 1:18 (100KB))).


3)click to select the moustache position
click "share"


4-a)click "google buzz logo"
you get
"https://accounts.google.com/o/oauth2/auth?response_type=code&scope=https://www.googleapis.com/auth/buzz&redirect_uri=...."
with this window:


An error can occurs if you spend time... 

 Post successful:

clic on the image (PC: right or mac: ctrl click) and you get the local menu with these items and you can save your image on your local hard disk:
 The defaut name of the image is "vi":
 Finally the file is a .jpeg of 25KB (1:27) with the same 650X755 pixels.

you have also an URL for your image:
http://moustach-io.appspot.com/v/13a451cec2898e4a

4-b) If you select "twitter", this Go-GEA creates this URL:  http://twitter.com/intent/session?return_to=%2Fintent%2Ftweet%3Fsource%3Dwebclient%26text%3DMoustachio%2Bhttp%253A%252F%252Fmoustach-io.appspot.com%252Fv%252F13a451cec2898e4a&source=webclient&text=Moustachio+http%3A%2F%2Fmoustach-io.appspot.com%2Fv%2F13a451cec2898e4a

If your have been connected then you will get this window:
That's all!!!

-------------------source
moutachio.appspot.com is an example:
http://code.google.com/p/appengine-go/source/browse/example/

Get a local copy of the appengine-go repository with this command (clone with mercurial):
http://code.google.com/p/appengine-go/source/checkout

When you download the SDK (go_appengine_sdk_darwin_386-1.5.0.zip) and install on your local hard disk,
in the menu demos, the source is in  go-moustachio.

----see:
http://code.google.com/appengine/docs/go/gettingstarted/

---- code of (http://moustach-io.appspot.com/)
http://code.google.com/p/appengine-go/source/browse/#hg%2Fexample%2Fmoustachio
This program requires the freetype-go and goauth2 libraries:
http://code.google.com/p/appengine-go/source/browse/example/moustachio/README

They should be checked out in this directory under these paths:

freetype-go.googlecode.com
goauth2.googlecode.com

This is so that these packages can be imported by Moustachio:

"freetype-go.googlecode.com/hg/freetype/raster"
"goauth2.googlecode.com/hg/oauth"

You can do this by running these commands:

hg clone https://freetype-go.googlecode.com/hg \
freetype-go.googlecode.com/hg

hg clone https://goauth2.googlecode.com/hg \
goauth2.googlecode.com/hg

------------------go-and-google-app-engine


http://blog.golang.org/2011/05/go-and-google-app-engine.html
Google’s App Engine provides a reliable, scalable, easy way to build and deploy applications for the web. Over a hundred thousand apps are hosted at appspot.com and custom domains using the App Engine infrastructure.
Originally written for Python apps, in 2009 the system added a Java runtime. And today (@may 2011), at Google I/O, we’re thrilled to announce that Go will be next.

You don’t even need to have Go installed beforehand because the SDK is fully self-contained. Just download the SDK, unzip it, and start coding. Moreover, the SDK’s “dev app server” means you don’t even need to run the compiler yourself; everything is delightfully automatic.

Code is deployed in source form and compiled in the cloud using the 64-bit x86 compiler (6g), making it the first true compiled language that runs on App Engine. Go on App Engine makes it possible to deploy efficient, CPU-intensive web applications.

-----------deployment of Go apps 
Today (since @may 2011), through the SDK, you’ll be able to write web apps, learn about the APIs (and the language, if it’s new to you), and run your web app locally. Once full deployment is enabled, it’ll be easy to push your app to Google’s cloud.

http://blog.golang.org/2011/05/go-and-google-app-engine.html

Please note that deployment of Go apps is currently restricted to
trusted testers only. The appcfg.py tool will give an error message if
you have not been listed as a trusted tester.
To become a trusted tester, sign up using this form: http://goo.gl/otZVa
We will be letting in more testers over the next few weeks as we
smooth out any issues that arise.


We are no longer accepting Trusted Tester applications (@june 2011). We hope to open the
service to the general public soon.
---

google Buzz: integration with other google services- Profile, blogspot, blogger, plusone; add button

"Finding relevance in the noise" has become a large-scale challenge, one that Google's experience in organizing information can help solve. We've recently launched innovations like real-time search and Social Search, and today we're taking another big step with the introduction of a new product, Google Buzz:
http://googleblog.blogspot.com/2010/02/introducing-google-buzz.html

Gmail
Google Buzz is a new way to start conversations about the things you find interesting. It's built right into Gmail, so you don't have to peck out an entirely new set of friends from scratch — it just works. If you think about it, there's always been a big social network underlying Gmail. Buzz brings this network to the surface by automatically setting you up to follow the people you email and chat with the most. We focused on building an easy-to-use sharing experience that richly integrates photos, videos and links, and makes it easy to share publicly or privately (so you don't have to use different tools to share with different audiences). Plus, Buzz integrates tightly with your existing Gmail inbox, so you're sure to see the stuff that matters most as it happens in real time.

Google Profile, see my profile: https://profiles.google.com/113300494682639557816/buzz


Blogger, blogspot:(the button Google_Buzz at the end of each post)


"+1", Google plusone.
with Google buzz , we have these services "stef42: has x followers. stef42: is following y."
compare  https://profiles.google.com/113300494682639557816/plusones
and https://profiles.google.com/113300494682639557816/buzz

Click +1 to publicly give something your stamp of approval. Your +1's can help friends, contacts, and others on the web find the best stuff when they search.
Want to put the +1 button on your own website? Get the code: http://www.google.com/intl/en/webmasters/+1/button/index.html
Your +1’s are stored in a new tab on your Google profile. You can show your +1’s tab to the world, or keep it private and just use it to personally manage the ever-expanding record of things you love around the web.
http://www.google.com/+1/button/

---------add Google Buzz buttons to your site
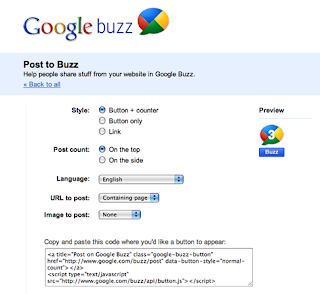
If you want to add Google Buzz buttons to your site, just go to http://www.google.com/buzz/stuff configure your buttons with a couple clicks and copy a few lines of JavaScript. Paste this code where you'd like the Buzz buttons to appear and you're all set.


And if you'd like to promote your own Google Buzz account, we have a button for you, which allows people to follow you on Buzz right from your blog or website. Here's an example using the Google Buzz team's own Buzz account (clicking it will take you to the Buzz team's profile page and from there you can easily follow our team's posts):

Buzz

You can grab that button code from buzz.google.com/stuff as well.

Sunday, July 3, 2011

Hello-guestbook with Google App Engine and webapp

This post is the second part of the post http://ex-ample.blogspot.com/2011/07/first-steps-google-appengine-mac.html (a tutorial for "dummies v0.0.0.1alpha").
    The  7 steps of this tutorial (D,E,F,G,H,I,J):
    • Creating a Simple Request Handler and the Configuration File
    • Using the webapp Framework
    • Using the Users Service
    • Handling Forms With webapp
    • Using the Datastore
    • Using Templates
    • Using Static Files
    corresponds to:
    1. http://code.google.com/appengine/docs/python/gettingstarted/helloworld.html
    2. http://code.google.com/appengine/docs/python/gettingstarted/usingwebapp.html
    3. http://code.google.com/appengine/docs/python/gettingstarted/usingusers.html
    4. http://code.google.com/appengine/docs/python/gettingstarted/handlingforms.html
    5. http://code.google.com/appengine/docs/python/gettingstarted/usingdatastore.html
      (Note: If you built your application using an earlier version of this Getting Started Guide, please note that the sample application has changed. You can still find the sample code for the original Guestbook application, which does not use ancestor queries, in the demos directory of the SDK)
    6. http://code.google.com/appengine/docs/python/gettingstarted/templates.html
    7. http://code.google.com/appengine/docs/python/gettingstarted/staticfiles.html
    --D----part D--- "Simple Request Handler and the Configuration File"
    http://code.google.com/appengine/docs/python/gettingstarted/helloworld.html
    your appspot.com=just a message.
    --E----part E--- webapp:
    In this above part-D, we have used the Common Gateway Interface (CGI) which is a standard (RFC 3875: CGI Version 1.1) that defines how web server software can delegate the generation of web pages to a stand-alone application or an executable file. Such applications, known as CGI scripts, can be written in any programming language, although scripting languages are often used.
    Now we will use the webapp Framework far better than the simple CGI.
    http://code.google.com/appengine/docs/python/gettingstarted/usingwebapp.html

    The CGI standard is simple, but it would be cumbersome to write all of the code that uses it by hand. Web application frameworks handle these details for you, so you can focus your development efforts on your application's features. Google App Engine supports any framework written in pure Python that speaks CGI (and any WSGI-compliant framework using a CGI adaptor), including:
     DjangoCherryPyPylonsweb.py, and web2py.

    You can bundle a framework of your choosing with your application code by copying its code into your application directory.
    App Engine includes a simple web application framework of its own, called webapp. The webapp framework is already installed in the App Engine environment and in the SDK, so you do not need to bundle it with your application code to use it. We will use webapp for the rest of this tutorial.
    A webapp application has 3 parts:
    • one or more RequestHandler classes that process requests and build responses
    • a WSGIApplication instance that routes incoming requests to handlers based on the URL
    • a main routine that runs the WSGIApplication using a CGI adaptor.
    Let's rewrite our friendly greeting (see the guestbook.py) as a webapp application.
    Edit guestbook.py and replace its contents with some lines of code posted at : http://code.google.com/appengine/docs/python/gettingstarted/usingwebapp.html:

    at this step, your appspot.com=just a message. See the source of the page:

    --F----part F---  the Users Service:
    the user gets a log-in window just an email.

    --G----part G--- Handling Forms With webapp:
    http://code.google.com/appengine/docs/python/gettingstarted/usingwebapp.html
    --H----part H--- Datastore:

    This latest version mixes HTML content with the code for the MainPage handler. This will make it difficult to change the appearance of the application, especially as our application gets bigger and more complex. Let's use templates to manage the appearance, and introduce static files for a CSS stylesheet.
    Continue to Using Templates.

    --I----part I--- the Templates:
    HTML embedded in code is messy and difficult to maintain. It's better to use a templating system, where the HTML is kept in a separate file. This separate file has a special syntax to indicate where the data from the application appears. There are many templating systems for Python:
     EZTCheetahClearSilverQuixoteDjango...
    You can use your template engine of choice by bundling it with your application code.

    The webapp module includes Django's templating engine. Versions 1.2 and 0.96 are included with the SDK and are part of App Engine, so you do not need to bundle Django yourself to use it.
    See the Django section of Third-party libraries for information on using supported Django versions:
    http://code.google.com/appengine/docs/python/tools/libraries.html#Django

    For the guestbook.py file, you have to :
    http://code.google.com/appengine/docs/python/gettingstarted/templates.html
    1)Add 2 lines of import statements at the top,
    2)Replace the MainPage handler with 10lines and this 2 lines:

    path = os.path.join(os.path.dirname(__file__), 'index.html')
            self.response.out.write(template.render(path, template_values))


    Finally, create a new file in the guestbook directory named "index.html".

    template.render(path, template_values) takes a file path to the template file and a dictionary of values, and returns the rendered text.
    The template uses Django templating syntax to access and iterate over the values, and can refer to properties of those values. In many cases, you can pass datastore model objects directly as values, and access their properties from templates.
    Tip: An App Engine application has read-only access to all of the files uploaded with the project, the library modules, and no other files. The current working directory is the application root directory, so the path to index.html is simply "index.html".


    --J----part J---the Static Files, example CSS file:
    Every web application returns dynamically generated HTML from the application code, via templates or some other mechanism. Most web applications also need to serve static content, such as images, CSS stylesheets, or JavaScript files. For efficiency, App Engine treats static files differently from application source and data files. You can use App Engine's static files feature to serve a CSS stylesheet for this application.


    Unlike a traditional web hosting environment, Google App Engine does not serve files directly out of your application's source directory unless configured to do so. We named our template file index.html, but this does not automatically make the file available at the URL /index.html.
    But there are many cases where you want to serve static files directly to the web browser. Images, CSS stylesheets, JavaScript code, movies and Flash animations are all typically stored with a web application and served directly to the browser. You can tell App Engine to serve specific files directly without your having to code your own handler.


    http://code.google.com/appengine/docs/python/gettingstarted/staticfiles.html


    1) Edit app.yaml and add:

    handlers:
    - url: /stylesheets
      static_dir: stylesheets
    --------
    The new handlers section defines two handlers for URLs. When App Engine receives a request with a URL beginning with /stylesheets, it maps the remainder of the path to files in the stylesheets directory and, if an appropriate file is found, the contents of the file are returned to the client. All other URLs match the / path, and are handled by the helloworld.py script.
    By default, App Engine serves static files using a MIME type based on the filename extension (http://en.wikipedia.org/wiki/MIME). For example, a file with a name ending in .css will be served with a MIME type of text/css. You can configure explicit MIME types with additional options.

    URL handler path patterns are tested in the order they appear in app.yaml, from top to bottom. In this case, the /stylesheets pattern will match before the /.* pattern will for the appropriate paths. For more information on URL mapping and other options you can specify in app.yaml, see the app.yaml reference:

    2) Create the directory guestbook/stylesheets and in this new directory, create a new file named "main.css"


    3) Finally, edit guestbook/index.html and insert 3 lines : 2  head tags and a CSS line.