Online Services headline animator, feedBurner

Thursday, June 30, 2011

Wednesday, June 29, 2011
Follow Your World - appspot.com -service google maps earth; Each time we update the satellite and aerial imagery in your area of interest, we'll notify you.

"Follow Your World": find out when new imagery is available in both Google Maps and Google Earth. It's simple. Search for your location, mark the point, and submit.
Each time we update the satellite and aerial imagery in your area of interest, we'll notify you.
Follow Your World - Home:
http://followyourworld.appspot.com/
- Step 1. Find a location. Search for the area by entering the name of a country, state, city, or a specific address. You can also enter the exact latitude/longitude of the location. Click Search Location to submit your search.
- Step 2. Drag the map to center the cross-hairs on the exact point that you would like to mark. Click Select Point to auto-generate the correct latitude and longitude.
- Step 3. Enter a location or edit the name to track this point in your dashboard. Click Submit when all the info is correct.
- Step 4. You'll receive an email to confirm your subscription.
google app engine: first account, first steps, hello (Go); create your first appspot.com; upload and deploy your first application; Go SDK
Account:
To get started, sign in to Google App Engine with your Google Account
(or explore our documentation to download our SDK and learn about what we're working on. If you'd like to sign in to Google App Engine with your Google Apps account, use the following URL:
https://appengine.google.com/a/YOURDOMAIN.COM/)
https://www.google.com/accounts/ManageAccount
see some snapshots:




You can create an Application:
NAME.appspot.com
(ex-ample.appspot.com)
and you have to choose your Application Title.
 read the agreement with google.
 3 possibilities for the options for authentication
At the end, you succeed with this window (https://appengine.google.com/start/createapp_success?app_id=s~ex-ample):

-----------with your google account, you get this:
 if you click "My application" link, you get this window.


http://googleappengine.googlecode.com/files/google-appengine-docs-20110620.zip
Download page:
http://code.google.com/appengine/downloads.html
For Go (only linux and Mac OSX):
http://code.google.com/appengine/downloads.html#Google_App_Engine_SDK_for_Go
For more information on the Google App Engine SDK for Go.
You develop and upload Go applications for Google App Engine using the App Engine Go software development kit (SDK).
http://code.google.com/appengine/docs/go/gettingstarted/devenvironment.html
The Go SDK includes a web server application that simulates the App Engine environment (including a local version of the datastore, Google Accounts, and the ability to fetch URLs and send email directly from your computer using the App Engine APIs).
The Go SDK uses slightly modified versions of the development tools from the Python SDK, and will run on any Intel-based Mac OS X (Mac OS X 10.5 Leopard users already have Python 2.5 installed) or Linux computer with Python 2.5
To get started, sign in to Google App Engine with your Google Account
(or explore our documentation to download our SDK and learn about what we're working on. If you'd like to sign in to Google App Engine with your Google Apps account, use the following URL:
https://appengine.google.com/a/YOURDOMAIN.COM/)
https://www.google.com/accounts/ManageAccount
see some snapshots:


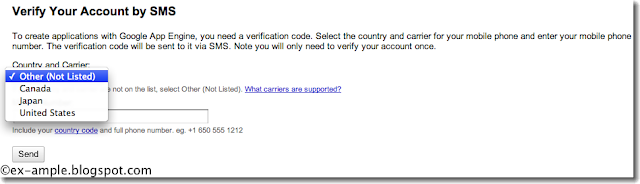
verify account by SMS

only canada, japan, US; for other countries, 3 steps:


At the end, in your google account, you will see "app engine":
After the SMS step,
you will receive on your cellular phone, a message:
"Google App Engine Code"
and a code with 7 numbers (see below "enter account code"):

NAME.appspot.com
(ex-ample.appspot.com)
and you have to choose your Application Title.


At the end, you succeed with this window (https://appengine.google.com/start/createapp_success?app_id=s~ex-ample):


View Dashboard:

Menu "Administration"-"Application Settings":

You cannot change "Application Identifier" but it is the place where you can change the "Application Title" and also Authentication Options.
----------------
You need to upload and deploy an application before you can make Web history.
At the top of the dashboard: Read about using appcfg to upload and deploy one.
In the window "application registered successfully",
"use AppCfg to upload and deploy your application code":
AppCfg Tool: http://code.google.com/appengine/docs/appcfg.html
The SDK includes a command for interacting with App Engine called AppCfg. You can use this command to upload new versions of the code, configuration and static files for your app. You can also use this command to manage datastore indexes and download log data.
A version of AppCfg is included with the SDK for each runtime environment. Select one of the following to view the appropriate documentation:
• Python Runtime - appcfg.py.
• Java Runtime - appcfg.
-----------------off line Google App Engine documentation
You can download an archive of the Google App Engine documentation to keep on your computer and read while not connected to the Internet:http://googleappengine.googlecode.com/files/google-appengine-docs-20110620.zip
-----------------getting started (3 programming languages)
-----------------Go (programming languages)Download page:
http://code.google.com/appengine/downloads.html
For Go (only linux and Mac OSX):
http://code.google.com/appengine/downloads.html#Google_App_Engine_SDK_for_Go
For more information on the Google App Engine SDK for Go.
You develop and upload Go applications for Google App Engine using the App Engine Go software development kit (SDK).
http://code.google.com/appengine/docs/go/gettingstarted/devenvironment.html
The Go SDK includes a web server application that simulates the App Engine environment (including a local version of the datastore, Google Accounts, and the ability to fetch URLs and send email directly from your computer using the App Engine APIs).
The Go SDK uses slightly modified versions of the development tools from the Python SDK, and will run on any Intel-based Mac OS X (Mac OS X 10.5 Leopard users already have Python 2.5 installed) or Linux computer with Python 2.5
Then App Engine applications can be implemented using the Go programming language.
Go "a programming language":
- http://code.google.com/appengine/docs/go/overview.html
- http://golang.org/
- http://en.wikipedia.org/wiki/Go_(programming_language)
-----------------getting started (with Go and Google App Engine)
This tutorial describes how to develop and deploy a simple Go project with Google App Engine. The example project, a guest book, demonstrates how to use the Go runtime environment.
In this tutorial, you will learn how to:
- build an App Engine application using Go,
- use the Go http package, to serve web pages,
- use the App Engine datastore with the Go datastore API,
- integrate an App Engine application with Google Accounts for user authentication,
- use Go's template package, with your app, and
- upload your app to App Engine.
By the end of the tutorial, you will have implemented a working application, a simple guest book that lets users post messages to a public message board.
---install SDK:
Follow the instructions on the download page to install the SDK on your computer.
For this tutorial, you will use two commands from the SDK:
- dev_appserver.py, the development web server
- appcfg.py, for uploading your app to App Engine
You can find these commands in the "google_appengine" directory of the zip archive.
--HELLO WORLD
http://code.google.com/appengine/docs/go/gettingstarted/helloworld.htmlGo App Engine applications communicate with the outside world via a web server compatible with Go's http package: http://golang.org/pkg/http/
This makes writing Go App Engine applications very similar to writing stand-alone Go web applications.
HTML5 Rocks -A resource for open web HTML5-Rendering HTML5 in older browsers with Google Chrome Frame
google Webmaster services; Rich Snippets Testing Tool; increase traffic blog/site

Use the Rich Snippets Testing Tool to check that Google can correctly parse your structured data markup and display it in search results.
Webmaster Tools - Rich Snippets Testing Tool:
http://www.google.com/webmasters/tools/richsnippets
google webmaster central:
http://www.google.com/webmasters/
- Increase traffic to your site
- Get data about crawling, indexing and search traffic. Receive notifications about problems on your site.
- Find out how Google sees your site
- Verified site owners can see information about how Google crawls, indexes and ranks your site
- Analyze search data
- See how many people found your site in search results, and how many people clicked on it
- Check who links to you
- We track links from all over the web, and we'll show you who added a link to your site
- Tell Google about your site
- Submit Sitemaps and see how many pages we added to the index
Gallery of appspot.com: With Google App Engine, there are no servers to maintain: you just upload your application, and it's ready to serve your users; Java;Python;Go; webapp2

You can serve your app from your own domain name (such as http://www.example.com/) using Google Apps, or, you can serve your app using a free name on the appspot.com domain.
Some "ex-amples":
one of my appspot.com: http://ex-ample.appspot.com/
http://imagecharteditor.appspot.com/
http://scikits.appspot.com/
------------
HTML5, HTMLfive:
http://html5-demos.appspot.com/
http://code.google.com/p/html5wow/
(Source code for the slides and demos of the "HTML5 Showcase for Developers: The Wow and the How" talk at Google I/O 2011):
- 4 presentations
1) http://www.htmlfivewow.com/slide1(upload image file; upload directory; drag and drop;load photoGallery.zip and progress bar; create data URL;HTML5 terminal;CSS, inline SVG,PUT TEXT ON PATH (slide 40),movement, 3D CSS,sprites,generating sound (slide 60), real time analysis )
2) http://html5-demos.appspot.com/static/addoncon2010/index.html : "utilizing HTML5 in chrome extension"(slide 11: Auto-save Text d'un textarea (local); slide 12: screen capture https://chrome.google.com/extensions/detail/cpngackimfmofbokmjmljamhdncknpmg;
slide 20: create ToDo list; slide 29: getting file handle; slide 30: getting directory;slide 31: getting MP3 and a fileList; slice 32: Drag and Drop image files from your desktop; slice 33: Drag-out Files (PDF, MP3) from Desktop; http://www.html5rocks.com/en/tutorials/file/dndfiles/#toc-slicing-files;
3) http://html5-demos.appspot.com/static/html5storage/index.html#slide1: "storage";
4) http://html5-demos.appspot.com/static/gddbr2010-keynote/index.html#slide1; slide 2: game canvas 2D; games Canvas 3D;slide 8: speech input; slide 9:Device Orientation gyro;slide 11: video puzzle; - 3 demos
- 1 "other": http://html5-demos.appspot.com/static/googlela/demos.html;
http://gwthtml5.appspot.com/#slide2
http://code.google.com/p/sfeir/source/browse/trunk/html5-slides/
(see: JS API (example web workers; slide 13: twitter notification); HTML (microdata; slide 22: add CSS video reflection), CSS (slide 27: text wrapping, slide 28: columns,slide 29: text stroke, slide 30: opacity, slide 31: color; slide 32: Rounded corner; gradient; shadows, transition,transform,animation )
and also
http://code.google.com/p/html5-slides/ condensed to http://code.google.com/p/html5rocks/
-------------
http://htmlfive.appspot.com/: "choose your HTML5 adventure"
http://ghtml5.appspot.com/#slide1: "The web as the development platform";
slide 3: 2008: comparison browsers HTML5; slide 4: 2010 comparison browsers HTML5;
slide 6:Save text value on the client side (crash-safe); slide 14: speech input;
--------------
html5rocks: VERY GOOD HTML5 ex-amples
http://www.html5rocks.com/en/features/
http://www.html5rocks.com/en/features/graphics
---------------
http://kurrik-slides.appspot.com/html5-techtalk/#slide1
Reasons to like Google Chrome; Reasons to like HTML5.
slide 23:websockets;slide33:CSS;
---------------
http://londonwebstorenight.appspot.com/webstore/index.html#slide1
slide 21: extension chrome;
http://code.google.com/chrome/webstore/docs/
http://londonwebstorenight.appspot.com/html5/index.html#slide1
slide 16: paint;slide 25: google font api; slide 27: CSS supports 100% height and vertical centering;
--------------
gallery of appspot.com:
"hello equivalent of image processing":
http://rest-remote-image.appspot.com/
http://dwigif.appspot.com/ (create gif with "glasses")
http://nyem.appspot.com/3d.html (3d earth)
http://nuslibrary.appspot.com/ (3D interactive map)
http://ip-geo.appspot.com/
http://mapstraction.appspot.com/
http://jolecule.appspot.com/
(the web-based protein viewer - no plugins needed; app engine)
example of STORE:
https://sketchupprostore.appspot.com/index.ep
example of two demo: jQuery File Upload and OpenID Login:
http://aquantum-demo.appspot.com
(You can drag & drop links to uploaded files on your desktop with Google Chrome)
http://blogger2wordpress.appspot.com/
conversion blogger ---wordpresscom
http://ex-ample.blogspot.com/2011/06/wordpress2blogger-conversion-utility.html
list of accepted projects (Google Summer of Code 2011):
http://socghop.appspot.com/gsoc/projects/list/google/gsoc2011
-----------------------
- Run your web applications on Google's infrastructure .Google App Engine enables developers to build web applications on the same scalable systems that power our own applications.
- No assembly required. Google App Engine exposes a fully-integrated development environment. It's easy to scale. Google App Engine makes it easy to design scalable applications that grow from one to millions of users without infrastructure headaches.
- It's free to get started. Every Google App Engine application will have enough CPU, bandwidth, and storage to serve around 5 million monthly pageviews for free. You can purchase additional resources at competitive prices when you need them and you'll pay only for what you use.
- Every Google App Engine application can use up to free 500MB persistent storage.
Getting Started : 3 languages Java, Python, Go (hello and ex-ample "a guest book"):
Google App Engine supports apps written in several programming languages. With App Engine's Java runtime environment, you can build your app using standard Java technologies, including the JVM, Java servlets, and the Java programming language—or any other language using a JVM-based interpreter or compiler, such as JavaScript or Ruby. App Engine also features a dedicated Python runtime environment, which includes a fast Python interpreter and the Python standard library, and a Go runtime environment that runs natively compiled Go code.
- Java The ex-ample project (a guest book) demonstrates how to use the Java runtime environment, and how to use several App Engine services.
http://code.google.com/appengine/docs/java/gettingstarted/
- Python This tutorial describes how to develop and deploy a simple Python project with Google App Engine. The example project, a guest book, demonstrates how to use the Python runtime environment.
http://code.google.com/appengine/docs/python/gettingstarted/
- Go The example project, a guest book, demonstrates how to use the Go runtime environment and how to use several App Engine services.
http://code.google.com/appengine/docs/go/gettingstarted/ - a statically typed, compiled language:
- a consistent and easy-to-use standard library
- access to hundreds of external libraries
- great for CPU-intensive tasks such as image manipulation
- the easiest way to deploy Go web apps
http://webapp-improved.appspot.com/
webapp and webapp2:
http://webapp-improved.appspot.com/features.html#features
QuickStart (http://webapp-improved.appspot.com/tutorials/quickstart.html):
- Create a directory hellowebapp2 for your new app. (appspot.com).
- Download webapp2, unpack it and add webapp2.py to that directory.
- If you want to use extra features also add the webapp2_extras directory to your app.
webapp2 also offers the package webapp2_extras (http://code.google.com/p/webapp-improved/source/browse/#hg%2Fwebapp2_extras) with several optional utilities: sessions, localization, internationalization, domain and subdomain routing, secure cookies and support for threaded environments.
Download:
http://webapp-improved.googlecode.com/files/webapp2-1.8.zip
----------------------------------------------------
résumé en français:
avec Google App Engine, il n'y pas de serveur à maintenir: il faut juste charger son application et c'est prêt pour les utilisateurs.
3 services gratuits:
Google Apps Script permet de développer des scripts et utilitaires intégrés aux Google Apps (agendas, feuilles de calcul, contacts, sites, etc.). Il permet d'interfacer les Google Apps avec des applications externes (une base de données, un flux ou un menu de saisie d'information par exemple).
Premier script avec le tableur style excel de documents:
http://code.google.com/googleapps/appsscript/articles/yourfirstscript.html
Google App Engine permet le développement rapide d'applications sur mesure, entièrement hébergées sur les infrastructures Google et intégrées aux Google Apps. On peut ainsi mettre en oeuvre des solutions Web spécifiques sécurisées écrites en Java ou en Python ou en GO, utilisant les nombreuses API et le SGBD Google. Le déploiement est rapide.
Google Apps sont les services google comme doc, search, map, gmail, ads, etc...
webapp2 est une amélioration de webapp: il passe à la version 2.1.8 (@june 2011)
Voir une Introduction à Google App Engine (@nov, 2009):
http://brocoli.developpez.com/articles/presentation/google-app-engine/
il y manque l'environnement GO.
Go SDK v1.5.1 a été publié le 20 juin 2011 (mac et linux).
Monday, June 27, 2011
Tutorial: Google Webmaster (with yolasite.com); how to increase your visibility in google search; sitemaps
Inclusion in Google's search results is free and easy; you don't even need to submit your site to Google.
But with Google Webmaster service/tools, you increase your visibility (also your sitemap).
To determine whether your site is currently included in Google's index, do a site: search for your site's URL. For example, a search for [ site:google.com ] returns the following results: http://www.google.com/search?q=site%3Agoogle.com .
https://www.google.com/support/webmasters/bin/topic.py?hl=en&topic=8465
http://www.google.com/support/webmasters/
Google Webmaster allows a better management of many blog (blogger, blogspot) and many sites:
all are in one page:



Your site will be verified and you should see the following screen:

But with Google Webmaster service/tools, you increase your visibility (also your sitemap).
To determine whether your site is currently included in Google's index, do a site: search for your site's URL. For example, a search for [ site:google.com ] returns the following results: http://www.google.com/search?q=site%3Agoogle.com .
https://www.google.com/support/webmasters/bin/topic.py?hl=en&topic=8465
http://www.google.com/support/webmasters/
Google Webmaster allows a better management of many blog (blogger, blogspot) and many sites:
all are in one page:

Google Webmaster is a tool that assists you in managing Google's indexing of your site, and improving the traffic to your website. This is an advanced lesson for those who would like to make use of this option.
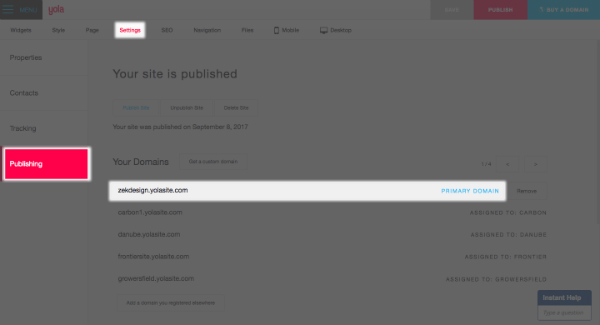
Yola has made it possible for you to take advantage of Google Webmaster's website optimization tools. The following lesson will give you step-by-step instructions on how to verify your site and submit a Sitemap to Google Webmaster:
Step 1: Verifying Your Site with Google Webmaster
Before attempting to verify your site with Google Webmaster, your site needs to be published, you will need the URL of your site in order to submit it for verification. If your site is not published yet and you need instructions on how to publish it, please see our tutorial: Publishing Your Site.
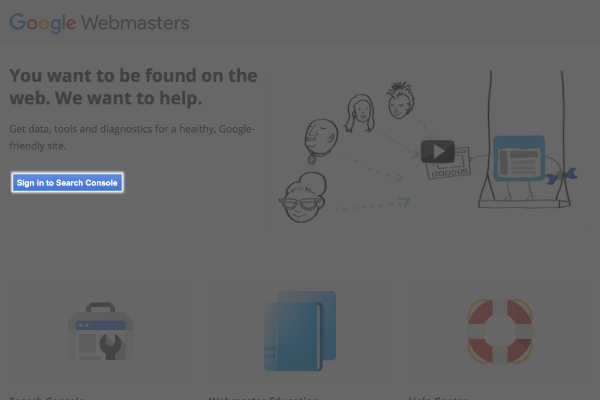
Once your site is published, and you have the URL, head on over to Google Webmaster to submit your site! You'll need to create a Google account if you don't have one, otherwise Sign in.
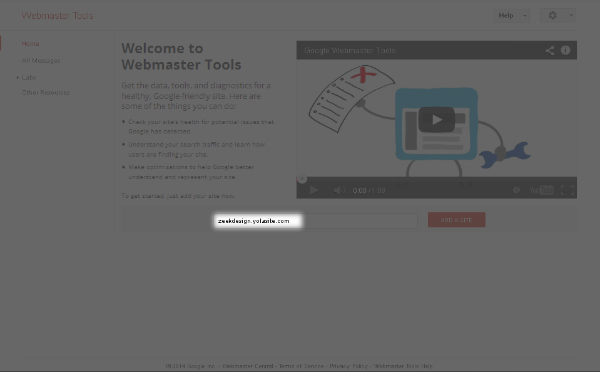
Once you have an account and have logged in, you will see a home page with a button "Add a Site" that prompts you to add a site. You should fill in the URL of your site here.
Important: Fill in the URL of your published site, not the your preview URL (the long URL you see when you preview your site from the Yola Sitebuilder). The URL of my test site is http://verifyinggwt.yolasite.com - type in the URL of YOUR site. When you are done, click "Continue".
If you have a custom domain such as mysite.com please make sure to enter it into the field including the www so it appears like http://www.mysite.com.
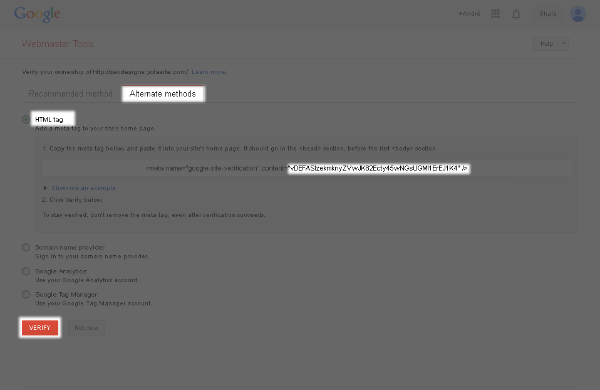
The next screen will give you options for verifying your site, please choose the "Add a meta tag to your site's home page".
This is the tricky part! You need to copy the correct portion in order to successfully add the code to your site. The bit you need is between the quotation marks and the section highlighted in the screenshot above.
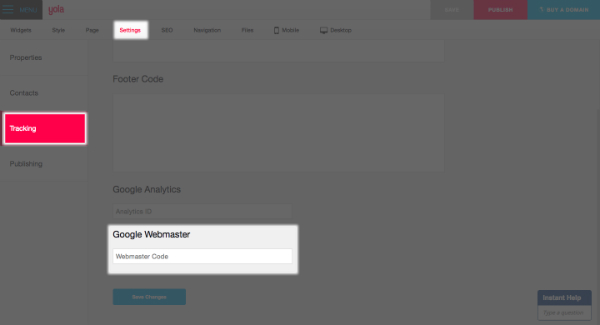
Now that you have the verification code it is time to apply this code to your site in the Sitebuilder. To do this:
Click on the down arrow of the "Site" option on the Toolbar
Choose "Site Properties"
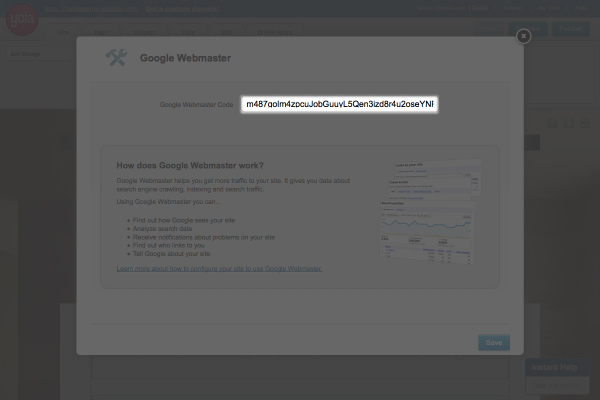
Add the code to the very last field titled "Google Webmaster Code"
Click "OK"
Click on the green "Publish to the web" button
Once you have pasted the code and republished your site, return to the Google Webmaster screen and click the "Verify" button
Congratulations! You have completed the first part of the process. If you wish, you can now proceed to step 2.
Step 2: Submitting a Sitemap to Google Webmaster
When you publish your site, Yola generates a Sitemap on your behalf. You can submit this Sitemap to Google Webmaster in order to give Google more information about your site. For more information on why you should submit a Sitemap, click here: What's a Sitemap. Here is how you can find the Sitemap for your published site. It is your domain name, followed by: "/sitemap.xml." So the URL of my Sitemap for my test site would be: http://verifyinggwt.yolasite.com/sitemap.xml.
On the Dashboard page (the same page you've just verified your domain on), click on "Submit a Sitemap" on the bottom right of the page, then on the next page click on "Submit a Sitemap" again. Your domain name will come up in a dialogue box, enter sitemap.xml after this and click on "Submit Sitemap".
Your site will be verified and you should see the following screen:
Congratulations! You have now verified your site with Google Webmaster tools and submitted a sitemap. Once Google crawls your site you will be able to log into your Google Webmaster account for data that will help you optimize your site for search engines.
Ref:
You can put a google gadget on your blogspot; vous pouvez mettre un gadget/widget sur vore blogger

------------STEP 1--------------
use the web service" igoogle"
http://www.google.com/ig
créer votre page igoogle
http://www.google.fr/ig/
(en français après les lignes en anglais).
------------STEP 2--------------
- click on "add gadget" (top right)
- after, click on "most users" (top left)
- click on "add it now" below the gadget you want to add
- now return to your igoogle page and you can see a new window
with your gadget - click on the top right corner (triangle symbol) of these window
and select in this little menu "about this gadget" - click on "embed this gadget" (right down of the page)
and now you see the page "Add this gadget to your webpage"
you can select "display settings" and "gadget settings",
click on the button "get the code" - Copy the HTML below
(a line with script tag)
you will paste this line (at the step 3)
to include this gadget on your blog
Go to the page of your "blogspot edit page"
(select in the menu "design")
Select "HTML/javascript"
and put it to a column
copy the line of code
and click on the button "save"
and click on save (design)
it's done!
------------étape 2-------------
cliquez sur "ajoutez gadgets" (en haut à gauche)
------------étape 3-------------
pour inclure votre google gadget sur votre blog
choisissez "HTML/javascript"
et mettez dans une colonne à la place désirée
w3schools on programming HTML forms and in JavaScript
For general information on programming HTML forms:
http://www.w3schools.com/html/html_forms.asp
For general information on programming in JavaScript:
http://www.w3schools.com/js/default.asp
http://www.w3schools.com/html/html_forms.asp
For general information on programming in JavaScript:
http://www.w3schools.com/js/default.asp
Sunday, June 26, 2011
Marquee tag in HTML for scrolling text
HTML provides a special feature which enables us to display scrolling and animated text in the Web page. This tag is supported by Internet Explorer , Firefox and Netscape 7 and above. Netscape has its blink tag which blinks text placed inside this tag, but Internet Explorer does not support blink tag. We can use marquee tag to scroll text or image in different directions. The text placed inside the marquee tag will start scrolling horizontally across the screen or the web page. Usually scrolling texts are used to give messages or display some special announcements to the visitors. Using this we can make some part of the text stand out than others. Over time as content became important the uses of animation reduced in last some years. Simple Marquee: Code for the above marquee Note: If |
Subscribe to:
Posts (Atom)