Sometimes I have to put text on a path

Wednesday, April 1, 2015

The potential function (and molecular dynamics), The non-bonded Lennard–Jones potential, The Tersoff potential ... ; polarisability


The potential functions representing the non-bonded energy are formulated as a sum over interactions between the particles of the system. 

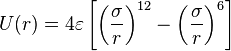
The simplest choice, employed in many popular force field (physics), is the "pair potential", in which the total potential energy can be calculated from the sum of energy contributions between pairs of atoms. An example of such a pair potential is the non-bonded Lennard–Jones potential (also known as the 6–12 potential), used for calculating van der Waals forces.
Another example is the Born (ionic) model of the ionic lattice. The first term in the next equation is Coulomb's law for a pair of ions, the second term is the short-range repulsion explained by Pauli's exclusion principle and the final term is the dispersion interaction term. Usually, a simulation only includes the dipolar term, although sometimes the quadrupolar term is included as well.(Usually known as Buckingham potential model)

Bond order potential is a class of empirical (analytical) interatomic potentials which is used in molecular dynamics and molecular statics simulations. Examples include the Tersoff potential, the Brenner potential, the Finnis-Sinclair potentials,  ReaxFF, and the second-moment tight-binding potentials. 
They have the advantage over conventional molecular mechanics force fields in that they can, with the same parameters, describe several different bonding states of an atom, and thus to some extent may be able to describe chemical reactions correctly. The potentials were developed partly independently of each other, but share the common idea that the strength of a chemical bond depends on the bonding environment, including the number of bonds and possibly also angles and bond length. It is based on the Linus Pauling bond order concept and can be written in the form
This means that the potential is written as a simple pair potential depending on the distance between two atoms r_{ij}, but the strength of this bond is modified by the environment of the atom i via the b_{ijk} term. Alternatively, the energy can be written in the form
where \rho_i is the electron density at the location of atom i. These two forms for the energy can be shown to be equivalent. 

The Tersoff potential (which was originally used to simulate carbon, silicon and germanium and has since been used for a wide range of other materials) involves a sum over groups of three atoms, with the angles between the atoms being an important factor in the potential. 
Other examples are the embedded-atom method (EAM) and the Tight-Binding Second Moment Approximation (TBSMA) potentials, where the electron density of states in the region of an atom is calculated from a sum of contributions from surrounding atoms, and the potential energy contribution is then a function of this sum.

------------------
Most classical force fields implicitly include the effect of polarizability, e.g. by scaling up the partial charges obtained from quantum chemical calculations. These partial charges are stationary with respect to the mass of the atom. But molecular dynamics simulations can explicitly model polarizability with the introduction of induced dipoles through different methods, such as Drude particles or fluctuating charges. This allows for a dynamic redistribution of charge between atoms which responds to the local chemical environment.
For many years, polarizable MD simulations have been touted as the next generation. For homogenous liquids such as water, increased accuracy has been achieved through the inclusion of polarizability.
Some promising results have also been achieved for proteins. However, it is still uncertain how to best approximate polarizability in a simulation.

simple sample problems for LAMMPS

LAMMPS ("Large-scale Atomic/Molecular Massively Parallel Simulator") is a molecular dynamics program from Sandia National Laboratories.
LAMMPS is free, open-source software, distributed under the terms of the GNU General Public License GPL v2.

Molecular dynamics (MD) is a computer simulation of physical movements of atoms (and molecules  or particules) in the context of N-body simulation. The atoms are allowed to interact for a period of time, giving a view of the motion of the atoms. In the most common version, the trajectories of atoms and molecules are determined by numerically solving the Newton's equations of motion for a system of interacting particles, where forces between the particles and potential energy are defined by interatomic potentials or molecular mechanics force fields.


Rem: LAMMPS uses neighbor lists to keep track of nearby particles. The lists are optimized for systems with particles that are repulsive at short distances, so that the local density of particles never becomes too large.

The LAMMPS distribution includes an examples sub-directory with several sample problems. Each problem is in a sub-directory of its own. Most are 2d models so that they run quickly, requiring at most a couple of minutes to run on a desktop machine. Each problem has an input script (in.*) and produces a log file (log.*) and dump file (dump.*) when it runs. Some use a data file (data.*) of initial coordinates as additional input. A few sample log file outputs on different machines and different numbers of processors are included in the directories to compare your answers to. E.g. a log file like log.crack.foo.P means it ran on P processors of machine "foo".

These are the sample problems and their output in the various
sub-directories:

accelerate:  use of all the various accelerator packages
balance:  dynamic load balancing, 2d system
body:     body particles, 2d system
colloid:  big colloid particles in a small particle solvent, 2d system
comb:  models using the COMB potential
crack:  crack propagation in a 2d solid
deposit:  deposition of atoms and molecules onto a 3d substrate
dipole:   point dipolar particles, 2d system
dreiding: methanol via Dreiding FF
eim:      NaCl using the EIM potential
ellipse:  ellipsoidal particles in spherical solvent, 2d system
flow:  Couette and Poiseuille flow in a 2d channel
friction: frictional contact of spherical asperities between 2d surfaces
hugoniostat: Hugoniostat shock dynamics
indent:  spherical indenter into a 2d solid
kim:      use of potentials in Knowledge Base for Interatomic Models (KIM)
meam:  MEAM test for SiC and shear (same as shear examples)
melt:  rapid melt of 3d LJ system
micelle:  self-assembly of small lipid-like molecules into 2d bilayers
min:  energy minimization of 2d LJ melt
msst:  MSST shock dynamics
nb3b:     use of nonbonded 3-body harmonic pair style
neb:  nudged elastic band (NEB) calculation for barrier finding
nemd:  non-equilibrium MD of 2d sheared system
obstacle: flow around two voids in a 2d channel
peptide:  dynamics of a small solvated peptide chain (5-mer)
peri:  Peridynamic model of cylinder impacted by indenter
pour:     pouring of granular particles into a 3d box, then chute flow
prd:      parallel replica dynamics of vacancy diffusion in bulk Si
qeq:      use of the QEQ pacakge for charge equilibration
reax:     RDX and TATB models using the ReaxFF
rigid:    rigid bodies modeled as independent or coupled
shear:    sideways shear applied to 2d solid, with and without a void
snap:     use of SNAP potential for Ta
srd:      stochastic rotation dynamics (SRD) particles as solvent
snap:     NVE dynamics for BCC tantalum crystal using SNAP potential
tad:      temperature-accelerated dynamics of vacancy diffusion in bulk Si
voronoi:  test of Voronoi tesselation in compute voronoi/atom


http://lammps.sandia.gov/doc/Section_example.html
http://lammps.sandia.gov/doc/99/basics.html

Comparison of PBS and SLURM script

PBS Torque and SLURM scripts are two frameworks for specifying the resource requirements and settings for the job you want to run.  For the most part, there are equivalent settings in each script.  To help translate from one system to the other, the following table lists examples of equivalent options for PBS and SLURM job scripts.

Please note: SLURM can read PBS Torque script options, but we advise that it is safer to use pure SLURM commands.

Ref: https://vlsci.org.au/documentation/comparison-pbs-and-slurm-script-commands

A PBS script is a standard Unix/Linux shell script that contains a few extra comments at the beginning that specify directives to PBS. These comments all begin with #PBS.


PBS USER GUIDE


Overview

PBS is a job resource manager. A job is defined as a computational task such as computational simulation or data analysis. PBS provides job queuing and execution services in a batch cluster environment.
In the HPC systems, PBS works with the Moab job scheduler. PBS provides job information to Moab and Moab tells PBS which jobs to run and on what compute nodes in a cluster to run the jobs on.

Job Limits

PBS is configured on each system to have a number of separate job queues. There is a default queue on each system that every user has access to. Each funding group has its own queue.
These limits are placed on funding group queues:
Funding Group Queue Limits
LimitLion-X*
Maximum Walltime (Hours)96 (default) to 336+
Maximum Processors in Use Per UserNo Limit
Maximum Job Size (Processors)32
Note that the walltime limits placed on funding group queues are arbitrary and can be adjusted at the request of the group's PI.
If you believe you're part of a funding group of a system and you don't know what queue you should be using, please email us at support@ics.psu.edu stating what group you are part of and that you need to know your group queue.
These limits are placed on system default queues:
System Default Queue Limits
LimitLion-X*Lion-XKCyberStarClsf
Maximum Walltime (Hours)242496No Limit
Maximum Processors in Use Per User32No LimitNo LimitNo Limit
Maximum Job Size (Processors)32512 (nodes=64:ppn=8)256 (nodes=32:ppn=8)128 (nodes=1:ppn=128)
Most queue limits can be checked by running the command qstat -q.

Submitting a Job

Jobs are submitted to a PBS queue so that PBS can dispatch them to be run on one or more of a cluster's compute nodes. There are two main types of PBS jobs:
  • Non-interactive Batch Jobs: this is the most common PBS job. A job script is created that contains PBS resource requests and the commands necessary to execute the job. The job script is then submitted to PBS to be run non-interactively.
  • Interactive Batch Jobs: this is a way to get an interactive terminal on one or more of the compute nodes of a cluster. Commands can then be run interactily through that terminal directly on the compute nodes for the duration of the job. Interactive jobs are helpful for such things as program debugging and running many short jobs.

Non-interactive Batch Jobs

There are two steps to running a non-interactive batch job:
  1. Create a PBS Script
    A PBS script is a standard Unix/Linux shell script that contains a few extra comments at the beginning that specify directives to PBS. These comments all begin with #PBS. The most important PBS directives are:
    Definition of Important PBS Directives
    PBS DirectiveDescription
    #PBS -l walltime=HH:MM:SSThis directive specifies the maximum walltime (real time, not CPU time) that a job should take. If this limit is exceeded, PBS will stop the job. Keeping this limit close to the actual expected time of a job can allow a job to start more quickly than if the maximum walltime is always requested.
    #PBS -l pmem=SIZEgbThis directive specifies the maximum amount of physical memory used by any process in the job. For example, if the job would run four processes and each would use up to 2 GB (gigabytes) of memory, then the directive would read #PBS -l pmem=2gb. The default for this directive on Lion-XF and Lion-LSP is 1 GB (gigabyte) of memory. Other Lion clusters do not currently set a default.
    #PBS -l nodes=N:ppn=MThis specifies the number of nodes (nodes=N) and the number of processors per node (ppn=M) that the job should use. PBS treats a processor core as a processor, so a system with eight cores per compute node can have ppn=8 as its maximum ppn request. Note that unless a job has some inherent parallelism of its own through something like MPI or OpenMP, requesting more than a single processor on a single node is usually wasteful and can impact the job start time.
    #PBS -q queuenameThis specifies what PBS queue a job should be submitted to. This is only necessary if a user has access to a special queue. This option can and should be omitted for jobs being submitted to a system's default queue.
    #PBS -j oeNormally when a command runs it prints its output to the screen. This output is often normal output and error output. This directive tells PBS to put both normal output and error output into the same output file.
    The following is an example PBS script.
    # This is a sample PBS script. It will request 1 processor on 1 node
    # for 4 hours.
    #   
    #   Request 1 processors on 1 node 
    #   
    #PBS -l nodes=1:ppn=1
    #
    #   Request 4 hours of walltime
    #
    #PBS -l walltime=4:00:00
    #
    #   Request 1 gigabyte of memory per process
    #
    #PBS -l pmem=1gb
    #
    #   Request that regular output and terminal output go to the same file
    #
    #PBS -j oe
    #
    #   The following is the body of the script. By default,
    #   PBS scripts execute in your home directory, not the
    #   directory from which they were submitted. The following
    #   line places you in the directory from which the job
    #   was submitted.
    #
    cd $PBS_O_WORKDIR
    #
    #   Now we want to run the program "hello".  "hello" is in
    #   the directory that this script is being submitted from,
    #   $PBS_O_WORKDIR.
    #
    echo " "
    echo " "
    echo "Job started on `hostname` at `date`"
    ./hello
    echo " "
    echo "Job Ended at `date`"
    echo " "
    Note that the above example script is for a non-MPI job. Information on how to write PBS scripts for MPI jobs can be found in the MPI software pages.
  2. Submit the PBS Script to PBS for Execution
    Once a PBS script is created, it needs to be submitted to PBS so that it becomes eligible to be run. The command to submit a script to PBS is called qsub. The syntax of qsub is:
    qsub scriptfile
    The following is an example of using qsub to submit a PBS script called myjob.
    % qsub myjob
    95.lionxj.rcc.psu.edu
    The job script myjob has just been submitted to PBS and has been assigned the Job_ID 95.lionxj.rcc.psu.edu. This Job_ID can later be used to control the job.

Interactive Batch Jobs

Interactive PBS jobs are similar to non-interactive PBS jobs in that they are submitted to PBS via the command qsub. Submitting an interactive PBS job differs from a non-interactive PBS job in that a PBS script is not necessary. All PBS directives can be specified on the command line.
The syntax for qsub for submitting an interactive PBS job is:
qsub -I ... pbs directives ...
The -I flag above tells qsub that this is an interactive job. The following example shows using qsub to submit an interactive job using one processor on one node for four hours.
lionxi:~$ qsub -I -l nodes=1:ppn=1 -l walltime=4:00:00
qsub: waiting for job 1064159.lionxi.rcc.psu.edu to start
qsub: job 1064159.lionxi.rcc.psu.edu ready

lionxi25:~$
There are two things of note here. The first is that the qsub command doesn't exit when run with the interactive -I flag. Instead, it waits until the job is started and gives a prompt on the first compute node assigned to a job. The second thing of note is the prompt lionxi25:~$ - this shows that commands are now being executed on the compute node lionxi25.

Checking Job Status

The command to check job status is qstat. qstat has many options. Some common ones are:
PBS Commands for Checking Job Status
Command NameDescription of Command Functionality
qstatShows the status of all PBS jobs. The time displayed is the CPU time used by the job.
qstat -sShows the status of all PBS jobs. The time displayed is the walltime used by the job.
qstat -u useridShows the status all PBS jobs submitted by the user userid. The time displayed is the walltime used by the job.
qstat -nShows the status all PBS jobs along with a list of compute nodes that the job is running on.
qstat -f jobidShows detailed information about the job jobid.
A job can be in several different states. The most common ones are:
PBS Job States
StateMeaning
QThe job is queued and is waiting to start.
RThe job is currently running.
EThe job is currently ending.
HThe job has a user or system hold on it and will not be eligible to run until the hold is removed.
  • Example: qstat output
    lionxj:~$ qstat
    Job id        Name           User     Time Use S Queue
    ------------- -------------- -------- -------- - -----
    10.lionxj     sparse         abc123   188:20:2 R lionxj
    11.lionxj     test           jwh128   00:00:18 R lionxj-admin
    ...

    • Job id: the job's unique indentifier
    • Name: name of the job
    • User: user that owns the job
    • Time Use: CPU time used by the job
    • S: state of the job
    • Queue: the queue the job is in
  • Example: qstat -s output
    lionxj:~$ qstat -s
    
    lionxj.rcc.psu.edu: 
                                                            Req'd  Req'd   Elap
    Job ID        Username Queue    Jobname  SessID NDS TSK Memory Time  S Time
    ------------- -------- -------- -------- ------ --- --- ------ ----- - -----
    10.lionxj.rcc abc123   lionxj   sparse   5793     4  --    2gb 190:0 R 189:2
        --
    11.lionxj.rcc jwh128   lionxj-a test     11946    3  --    --  500:0 R 166:5
        -- 
    ...

    • Job id: the job's unique indentifier
    • Username: user that owns the job
    • Queue: the queue the job is in
    • Jobname: the name of the job
    • NDS: the number of compute nodes the job is using
    • Req'd Memory: the memory requested for the job
    • Req'd Time: the walltime requested for the job
    • S: the state of the job
    • Elap Time: the elapsed walltime for the job

Deleting a Job

The command to delete a job is qdel. Its syntax is "qdel Job_ID".
PBS Commands for Deleting Jobs
Command NameDescription of Command Functionality
qdel Job_IDDeletes the job identified by Job_ID.
qdel $(qselect -u username)Deletes all jobs belonging to user username.
  • Example: deleting a job with Job_ID 10
    lionxj:~$ qdel 10
  • Example: deleting all jobs belonging to user abc123
    lionxj:~$ qdel $(qselect -u abc123)

Viewing Job Output

By default PBS will write screen output from a job to the follwing files:

PBS Output Files
Output File NameContents of Output File
Jobname.oJob_IDThis file would contain the non-error output that would normally be written to the screen.
Jobname.eJob_IDThis file would contain the error output that would normally be written to the screen.
If the PBS directive #PBS -j oe is used in a PBS script, the non-error and the error output are both written to the Jobname.oJob_ID file.

More Information

More information on PBS and PBS scripts can be found in the man pages for the commands qsub, pbs_resources, qstat, and qdel.

Ref: https://rcc.its.psu.edu/user_guides/system_utilities/pbs/

PBS script

Sample PBS script for serial job

For most applications, you should only need to change items indicated in red. Items shown in amber may also warrant your attention.

#!/bin/sh -f

###############################################################
#                                                             #
#    Bourne shell script for submitting a serial job to the   #
#    PBS queue using the qsub command.                        #
#                                                             #
###############################################################

#     Remarks: A line beginning with # is a comment.
#       A line beginning with #PBS is a PBS directive.
#              PBS directives must come first; any directives
#                 after the first executable statement are ignored.
#
 
##########################
#                        #
#   The PBS directives   #
#                        #
##########################

#          Set the name of the job (up to 15 characters,
#          no blank spaces, start with alphanumeric character)

#PBS -N JobName

#          By default, the standard output and error streams are sent
#          to files in the current working directory with names:
#              job_name.osequence_number  <- output="" p="">#              job_name.esequence_number  <- error="" p="">#          where job_name is the name of the job and sequence_number
#          is the job number assigned when the job is submitted.
#          Use the directives below to change the files to which the
#          standard output and error streams are sent.

#    #PBS -o stdout_file
#    #PBS -e stderr_file

#          The directive below directs that the standard output and
#          error streams are to be merged, intermixed, as standard
#          output.

#PBS -j oe

#          Specify the maximum cpu and wall clock time. The wall
#          clock time should take possible queue waiting time into
#          account.  Format:   hhhh:mm:ss   hours:minutes:seconds
#          Be sure to specify a reasonable value here.
#          If the job does not finish by the time reached,
#          the job is terminated.

#PBS -l     cput=6:00:00
#PBS -l walltime=6:00:00

#          Specify the queue.  The CMU cluster currently has three queues:
#          "green", "blue", and "red".  Jobs submitted to these queues
#          will run in cpu-dedicated mode; if all cpu's assigned to the
#          queue are occupied with a job, then new jobs are queued and will
#          not run until a cpu is freed up.  You should take this waiting
#          time into account when setting "walltime".

#PBS -q green

#          Specify the maximum amount of physical memory required.
#          kb for kilobytes, mb for megabytes, gb for gigabytes.
#          Take some care in setting this value.  Setting it too large
#          can result in your job waiting in the queue for sufficient
#          resources to become available.

#PBS -l mem=512mb

#          PBS can send informative email messages to you about the
#          status of your job.  Specify a string which consists of
#          either the single character "n" (no mail), or one or more
#          of the characters "a" (send mail when job is aborted),
#          "b" (send mail when job begins), and "e" (send mail when
#          job terminates).  The default is "a" if not specified.
#          You should also specify the email address to which the
#          message should be send via the -M option.

#  #PBS -m abe
#  #PBS -m ae

#PBS -M user_email_address

#          Declare the time after which the job is eligible for execution.
#          If you wish the job to be immediately eligible for execution,
#          comment out this directive.  If you wish to run at some time in
#          future, the date-time argument format is
#                      [DD]hhmm
#          If the day DD is not specified, it will default to today if the
#          time hhmm is in the future, otherwise, it defaults to tomorrow.
#          If the day DD is specified as in the future, it defaults to the
#          current month, otherwise, it defaults to next month.

# #PBS -a 2215  commented out

#          Specify the priority for the job.  The priority argument must be
#          an integer between -1024 and +1023 inclusive.  The default is 0.

#  #PBS -p 0

#          Specify the number of nodes requested and the
#          number of processors per node.

#PBS -l nodes=1:ppn=1

#          Define the interval at which the job will be checkpointed,
#          if checkpointing is desired, in terms of an integer number
#          of minutes of CPU time.

#  #PBS -c c=2

##########################################
#                                        #
#   Output some useful job information.  #
#                                        #
##########################################

echo ------------------------------------------------------
echo -n 'Job is running on node '; cat $PBS_NODEFILE
echo ------------------------------------------------------
echo PBS: qsub is running on $PBS_O_HOST
echo PBS: originating queue is $PBS_O_QUEUE
echo PBS: executing queue is $PBS_QUEUE
echo PBS: working directory is $PBS_O_WORKDIR
echo PBS: execution mode is $PBS_ENVIRONMENT
echo PBS: job identifier is $PBS_JOBID
echo PBS: job name is $PBS_JOBNAME
echo PBS: node file is $PBS_NODEFILE
echo PBS: current home directory is $PBS_O_HOME
echo PBS: PATH = $PBS_O_PATH
echo ------------------------------------------------------

##############################################################
#                                                            #
#   The prologue script automatically makes a directory      #
#   on the local disks for you.  The name of this directory  #
#   depends on the job id, but you need only refer to it     #
#   using ${WORKDIR}.                                        #
#                                                            #
##############################################################

SERVER=$PBS_O_HOST
WORKDIR=/scratch/PBS_$PBS_JOBID
SCP=/usr/bin/scp
SSH=/usr/bin/ssh

######################################################################
#                                                                    #
#   To minimize communications traffic, it is best for your job      #
#   to work with files on the local disk of the compute node.        #
#   Hence, one needs to transfer files from your permanent home      #
#   directory tree to the directory ${WORKDIR} automatically         #
#   created by PBS on the local disk before program execution,       #
#   and to transfer any important output files from the local        #
#   disk back to the permanent home directory tree after program     #
#   execution is completed.                                          #
#                                                                    #
#   There are essentially two ways to achieve this: (1) to use the   #
#   PBS stagein and stageout utilities, or (2) to manually copy the  #
#   files by commands in this script.  The stagein and stageout      #
#   features of OpenPBS are somewhat awkward, especially since       #
#   wildcards and macros in the file lists cannot be used.  This     #
#   method also has some timing issues.  Hence, we ask you to use    #
#   the second method, and to use secure copy (scp) to do the file   #
#   transfers to avoid NSF bottlenecks.                              #
#                                                                    #
######################################################################

#####################################################
#                                                   #
#    Specify the permanent directory(ies) on the    #
#    server host.  Note that when the job begins    #
#    execution, the current working directory at    #
#    the time the qsub command was issued becomes   #
#    the current working directory of the job.      #
#                                                   #
#####################################################


PERMDIR=${HOME}/work

SERVPERMDIR=${PBS_O_HOST}:${PERMDIR}

echo server is $SERVER
echo workdir is $WORKDIR
echo permdir is $PERMDIR
echo servpermdir is $SERVPERMDIR
echo ------------------------------------------------------
echo -n 'Job is running on node '; cat $PBS_NODEFILE
echo ------------------------------------------------------
echo ' '
echo ' '

###############################################################
#                                                             #
#    Transfer files from server to local disk.                #
#                                                             #
###############################################################

stagein()
{
 echo ' '
 echo Transferring files from server to compute node
 echo Writing files in node directory  ${WORKDIR}
 cd ${WORKDIR}

 ${SCP} ${SERVPERMDIR}/input_file .
 ${SCP} ${SERVPERMDIR}/program_executable .

 echo Files in node work directory are as follows:
 ls -l
}

############################################################
#                                                          #
#    Execute the run.  Do not run in the background.       #
#                                                          #
############################################################

runprogram()
{
 program_executable < input_file > output_file }

###########################################################
#                                                         #
#   Copy necessary files back to permanent directory.     #
#                                                         #
###########################################################

stageout()
{
 echo ' '
 echo Transferring files from compute nodes to server
 echo Writing files in permanent directory  ${PERMDIR}
 cd ${WORKDIR}

 ${SCP} output_file  ${SERVPERMDIR}
 echo Final files in permanent data directory:
 ${SSH} ${SERVER} "cd ${PERMDIR}; ls -l"
 }

#####################################################################
#                                                                   #
#  The "qdel" command is used to kill a running job.  It first      #
#  sends a SIGTERM signal, then after a delay (specified by the     #
#  "kill_delay" queue attribute (set to 60 seconds), unless         #
#  overridden by the -W option of "qdel"), it sends a SIGKILL       #
#  signal which eradicates the job.  During the time between the    #
#  SIGTERM and SIGKILL signals, the "cleanup" function below is     #
#  run. You should include in this function commands to copy files  #
#  from the local disk back to your home directory.  Note: if you   #
#  need to transfer very large files which make take longer than    #
#  60 seconds, be sure to use the -W option of qdel.                #
#                                                                   #
#####################################################################

early()
{
 echo ' '
 echo ' ############ WARNING:  EARLY TERMINATION #############'
 echo ' '
 }

trap 'early; stageout' 2 9 15


##################################################
#                                                #
#   Staging in, running the job, and staging out #
#   were specified above as functions.  Now      #
#   call these functions to perform the actual   #
#   file transfers and program execution.        #
#                                                #
##################################################

stagein
runprogram
stageout

###############################################################
#                                                             #
#   The epilogue script automatically deletes the directory   #
#   created on the local disk (including all files contained  #
#   therein.                                                  #
#                                                             #
###############################################################

exit

Ref:
http://qcd.phys.cmu.edu/QCDcluster/pbs/run_serial.html

Tuesday, March 31, 2015

Introduction à l’utilisation d’Occigen du cines


Le système d’exploitation est de type linux basé sur une BullX AE4 (Redhat 6.4).Le cluster comprend plusieurs nœuds de connexion pour les utilisateurs. Lorsque la connexion est établie, l’utilisateur se trouve sur un de ces nœuds. L’affectation des connexion se fait en fonction de la disponibilité des noeuds de login. Il peut arriver que vous ne soyez pas connecter au même moment sur un noeud identique.
Occigen comprend 34 racks :
  • 27 racks de calcul (cf. description architecture)
  • 7 racks assurant la connexion, les machines de service et de gestion des disques.

Le cluster comprend 50544 cœurs répartis sur 2106 nœuds (chacun disposant de 2 processeurs Intel 12-Cores (E5-2690 à 2.6 GHz).
La machine est découpée en deux. La moitité des noeuds dispose de 64 Go de mémoire, l’autre moitié de 128 Go utile soit plus de 202 To au total. Les racks de calcul sont connectés à 5 racks montés sur un système de fichiers partagés Lustre avec une capacité de 5 Po utile au total. Le refroidissement est assuré par un système haut rendement à eau tiède directement dans les noeuds (mode DLC Direct Liquid Cooling).

La comptabilisation de la consommation, en heures de calcul sur ce cluster, est basée sur le temps d’utilisation des ressources (temps ELAPSED) et non plus sur le temps CPU. 
Les systèmes de fichier sont de deux types. Le /scratch (utilisé pour le stockage des résultats des calculs est de type Lustre. Il dispose de plus de 5 Po de surface utile et d’une bande passante maximum qui dépasse les 105 Go/s.
Le /home est de type Panasas, il est utilisé pour stocker les codes à executer, il profite d’une surface de 260 tO et d’une bande passante de 10 Go/s.
Pour stocker les résultat de façon plus sure, chaque noeud de la machine accède au système de fichier /store. Celui-ci est aussi un système Lustre, mais avec des mécanisme de sécurisation avancés (stockage dupliqué et conservation sur bandes). Il doit être utilisé pour assurer la bonne conservation des résultats.


----------------------------------------------------

Introduction à l’utilisation d’Occigen 

 Avant de commencer, il vous faut votre login et votre mot de passe Occigen. Si vous n’avez pas encore votre mot de passe, appelez le service svp au 04.67.14.14.99. 
Connexion à Occigen 
 Si vous êtes sous Windows, lancez un client SSH (putty, kitty) pour vous connecter à l'adresse d'Occigen : occigen.cines.fr Dans les paramètres de Putty : Category/SSH/X11 cochez la case ‘Enable X11 forwarding’ afin d’activer le renvoi des fenêtres graphiques. 
 Si vous êtes sous Linux, ouvrez un terminal, et connectez-vous à Occigen : ssh –X login@occigen.cines.fr 
Vous arrivez dans votre repertoire /home/login sur un nœud de connexion. Sur Occigen il y a plusieurs nœuds de connexion qui servent à compiler le programme, à le soumettre sur les nœuds de calcul et à accéder aux fichiers de résultats. 
L’environnement d’Occigen 
Sur Occigen, il y a un système de modules. Le chargement d’un module permet de modifier ou de positionner des variables d’environnement (PATH, LIBRARY_PATH etc…). Pour voir les modules chargés : login@occigen:~$ module list 1) /opt/modules/modulefiles/oscar-modules/1.0.3 
Aucun module n’est chargé par défaut (sauf le module qui gère les modules)

Bibliothèques communes

Les bibliothèques disponibles peuvent être visualisées ou chargées via les commandes :
  • module avail (pour lister ce qui est disponible)
  • module load  (pour charger une librairie ou un logiciel dans votre environnement).
  • module list (pour voir ce que vous avez déjà chargé).
  • module purge (pour retirer un environnement déjà chargé).
  • module show (pour voir le contenu du module)
-----------

Exécution et suivi d’un job

Il existe deux manières de lancer des travaux sur Occigen (ou ex-Jade)  : session interactive et session batch.
La première permet de se connecter aux nœuds de calcul via PBS pour ensuite pouvoir lancer des travaux en lignes sur ceux-ci.
La deuxième utilise des scripts PBS pour lancer des travaux en batch.
Attention : vous devez travailler dans votre espace /scratch !

Session Interactive

Pour avoir accès à une session interactive, la commande qsub -I est utilisé. Par exemple, pour avoir accès à 2 nœuds de calcul la commande suivante est utilisée :
>$ qsub -I -l select=2:ncpus=8:mpiprocs=8 -l walltime=00:05:00
Celle-ci permet de réserver, dans ce cas, 2 nœuds de calcul. L’utilisateur est connecté au premier nœud de calcul de la liste contenant les 2 nœuds réservés. Le temps maximum possible pour les sessions interactives est de 2 heures.
1. Exécuter un programme MPI :
>$ qsub -I -l select=2:ncpus=8:mpiprocs=8 -l walltime=00:05:00
Avec la librairie MPT , la commande suivante permet le binaire :
>$ mpiexec my_MPI_prog 
Pour cet exemple, le calcul sera exécuté avec 16 processus MPI.
2. Exécuter un programme OpenMP :
>$ qsub -I -l select=1:ncpus=8 -l walltime=00:05:00
L’exécution d’un binaire utilisant OpenMP se déroule de la même façon qu’un exécutable série excepté le fait qu’il faut spécifier le nombre de threads utilisés (nombre maximum de threads = 8) :
>$ export OMP_NUM_THREADS = number_of_threads
>$ ./my_openmp_prog
3. Exécuter un programme hybride (OpenMP / MPI)
>$ export OMP_NUM_THREADS = number_of_threads
>$ mpiexec ./my_hybrid_prog
L’exemple suivant concerne l’exécution d’une application avec 4 tâches MPI par nœud et 2 threads OpenMP par tâche MPI :
>$ qsub -I -l select=2:ncpus=8:mpiprocs=4 -l walltime=00:05:00
>$ export OMP_NUM_THREADS = 2
>$ mpiexec ./my_hybrid_prog
https://www.cines.fr/calcul/materiels/le-supercalculateur-jade/execution-et-suivi-dun-job/
------------
ref:
https://www.cines.fr/calcul/materiels/occigen/environnement/

Monday, March 30, 2015

LAMMPS: OS X with Homebrew

OS X with Homebrew

LAMMPS can be downloaded, built, and configured for OS X easily with Homebrew.

Paste that at a Terminal prompt:
ruby -e "$(curl -fsSL https://raw.githubusercontent.com/Homebrew/install/master/install)"


Only four of the LAMMPS packages are unavailable at this time because of additional needs not yet met: KIM, GPU, USER-CUDA, USER-ATC.
After installing Homebrew, you can install LAMMPS on your system with the following commands:
% brew tap homebrew/science
% brew install lammps              # serial version
% brew install lammps --with-mpi   # mpi support 
This will install the executable "lammps", a python module named "lammps", and additional resources with all the standard packages. To get the location of the additional resources type this:
% brew info lammps 
This command also tells you additional installation options available. The user-packages are available as options, just install them like this example for the USER-OMP package:
% brew install lammps --enable-user-omp 
It is usually best to install LAMMPS with the most up to date source files, which can be done with the "--HEAD" option:
% brew install lammps --HEAD 
To reinstall the LAMMPS HEAD, run this command occasionally (make sure to use the desired options).
% brew install --force lammps --HEAD ${options} 
Once LAMMPS is installed, you can test the installation with the Lennard-Jones benchmark file:
% brew test lammps -v 

VMD is a molecular visualization program for displaying, animating, and analyzing large biomolecular systems


VMD is designed for modeling, visualization, and analysis of biological systems such as proteins, nucleic acids, lipid bilayer assemblies, etc. It may be used to view more general molecules, as VMD can read standard Protein Data Bank (PDB) files and display the contained structure. 


VMD provides a wide variety of methods for rendering and coloring a molecule: simple points and lines, CPK spheres and cylinders, licorice bonds, backbone tubes and ribbons, cartoon drawings, and others. 

VMD can be used to animate and analyze the trajectory of a molecular dynamics (MD) simulation. 

In particular, VMD can act as a graphical front end for an external MD program by displaying and animating a molecule undergoing simulation on a remote computer.

http://www.ks.uiuc.edu/Research/vmd/allversions/what_is_vmd.html

Friday, March 27, 2015

iTerm2 terminal (Apple OSX)


Many features:
 http://iterm2.com/features.html

Terminal.app Mac OSX List Unix commands


Terminal (Terminal.app) is the terminal emulator included in the OS X operating system by Apple.
As a terminal emulator, the application provides text-based access to the operating system (or server) , in contrast to the mostly graphical nature of the user experience of OS X, by providing a command line interface to the operating system when used in conjunction with a Unix shell, such as bash.
Now with OSX 10.9.1, version of Terminal = 2.4

The preferences dialog for Terminal.app in OS X 10.8 (Mountain Lion) offers choices for values of the TERMenvironment variable. 
Available options are ansi, dtterm, nsterm, rxvt, vt52, vt100, vt102, xterm, xterm-16color andxterm-256color, which differ from the OS X 10.5 (Leopard) choices by dropping the xterm-color and adding xterm-16color and xterm-256color. 
These settings do not alter the operation of Terminal, and the xterm settings do not match the behavior of xterm.
Terminal includes several features that specifically access OS X APIs and features. These include the ability to use the standard OS X Help search function to find manual pages and integration with Spotlight

List Unix commands
http://www.math.harvard.edu/computing/unix/unixcommands.html
http://unixhelp.ed.ac.uk/alphabetical/index.html
http://unixhelp.ed.ac.uk/CGI/man-cgi?ls
gives "ls" with all options

http://www.unix-manuals.com/tutorials/unix/change-password/password-change.html

By alphabetical orders:
http://en.wikipedia.org/wiki/List_of_Unix_commands